My Custom Socket 7 Build
A couple years ago, I wrote a post about the 486 DX2 computer that I built and figured I would do the same with a Socket 7 build. Looking back at that post I wrote, I regret not discussing some of those hardware choices in more detail, so I will take the opportunity to go into more of those details here. Anyway, I've actually had this computer finished and working for almost the same amount of time as that 486 computer. Some little tweaks were made here and there, but for the past year its hardware has been left unchanged.
So, why build this machine anyway after building my 486 computer? Well, the obvious answer is that it's a more powerful system then a 486 (duh!), while still retaining practically all of the same DOS and Windows 3.1/9x compatibility that I personally, would care about. So does that mean that I don't need or want my 486 computer anymore? No, actually, truth be told, even though I've had this machine built for almost two years, I still use the 486 quite a lot more. Why? *shrug* The "old-school" charm of it? I cannot really answer that question in a logical way. They're both, to me, fun to use machines for different purposes. The 486 machine I like most for pure DOS, while this other computer is better for late DOS and early Windows 95/98 software.
More than that though, is that after finishing my 486 build, I had a spare baby AT computer case to either use or toss. The case I used for this Socket 7 build is the one that I originally bought to use for my 486 build. But when the case that I actually really wanted to use for the 486 popped up on eBay, I just had to get it and that left me with this spare case. These old AT cases are only getting harder and harder to find as time goes by, and so just tossing it out seemed silly. Plus the case was in such great shape too.
Motherboard
I had two Socket 7 motherboards on hand in preparation for this build, actually.
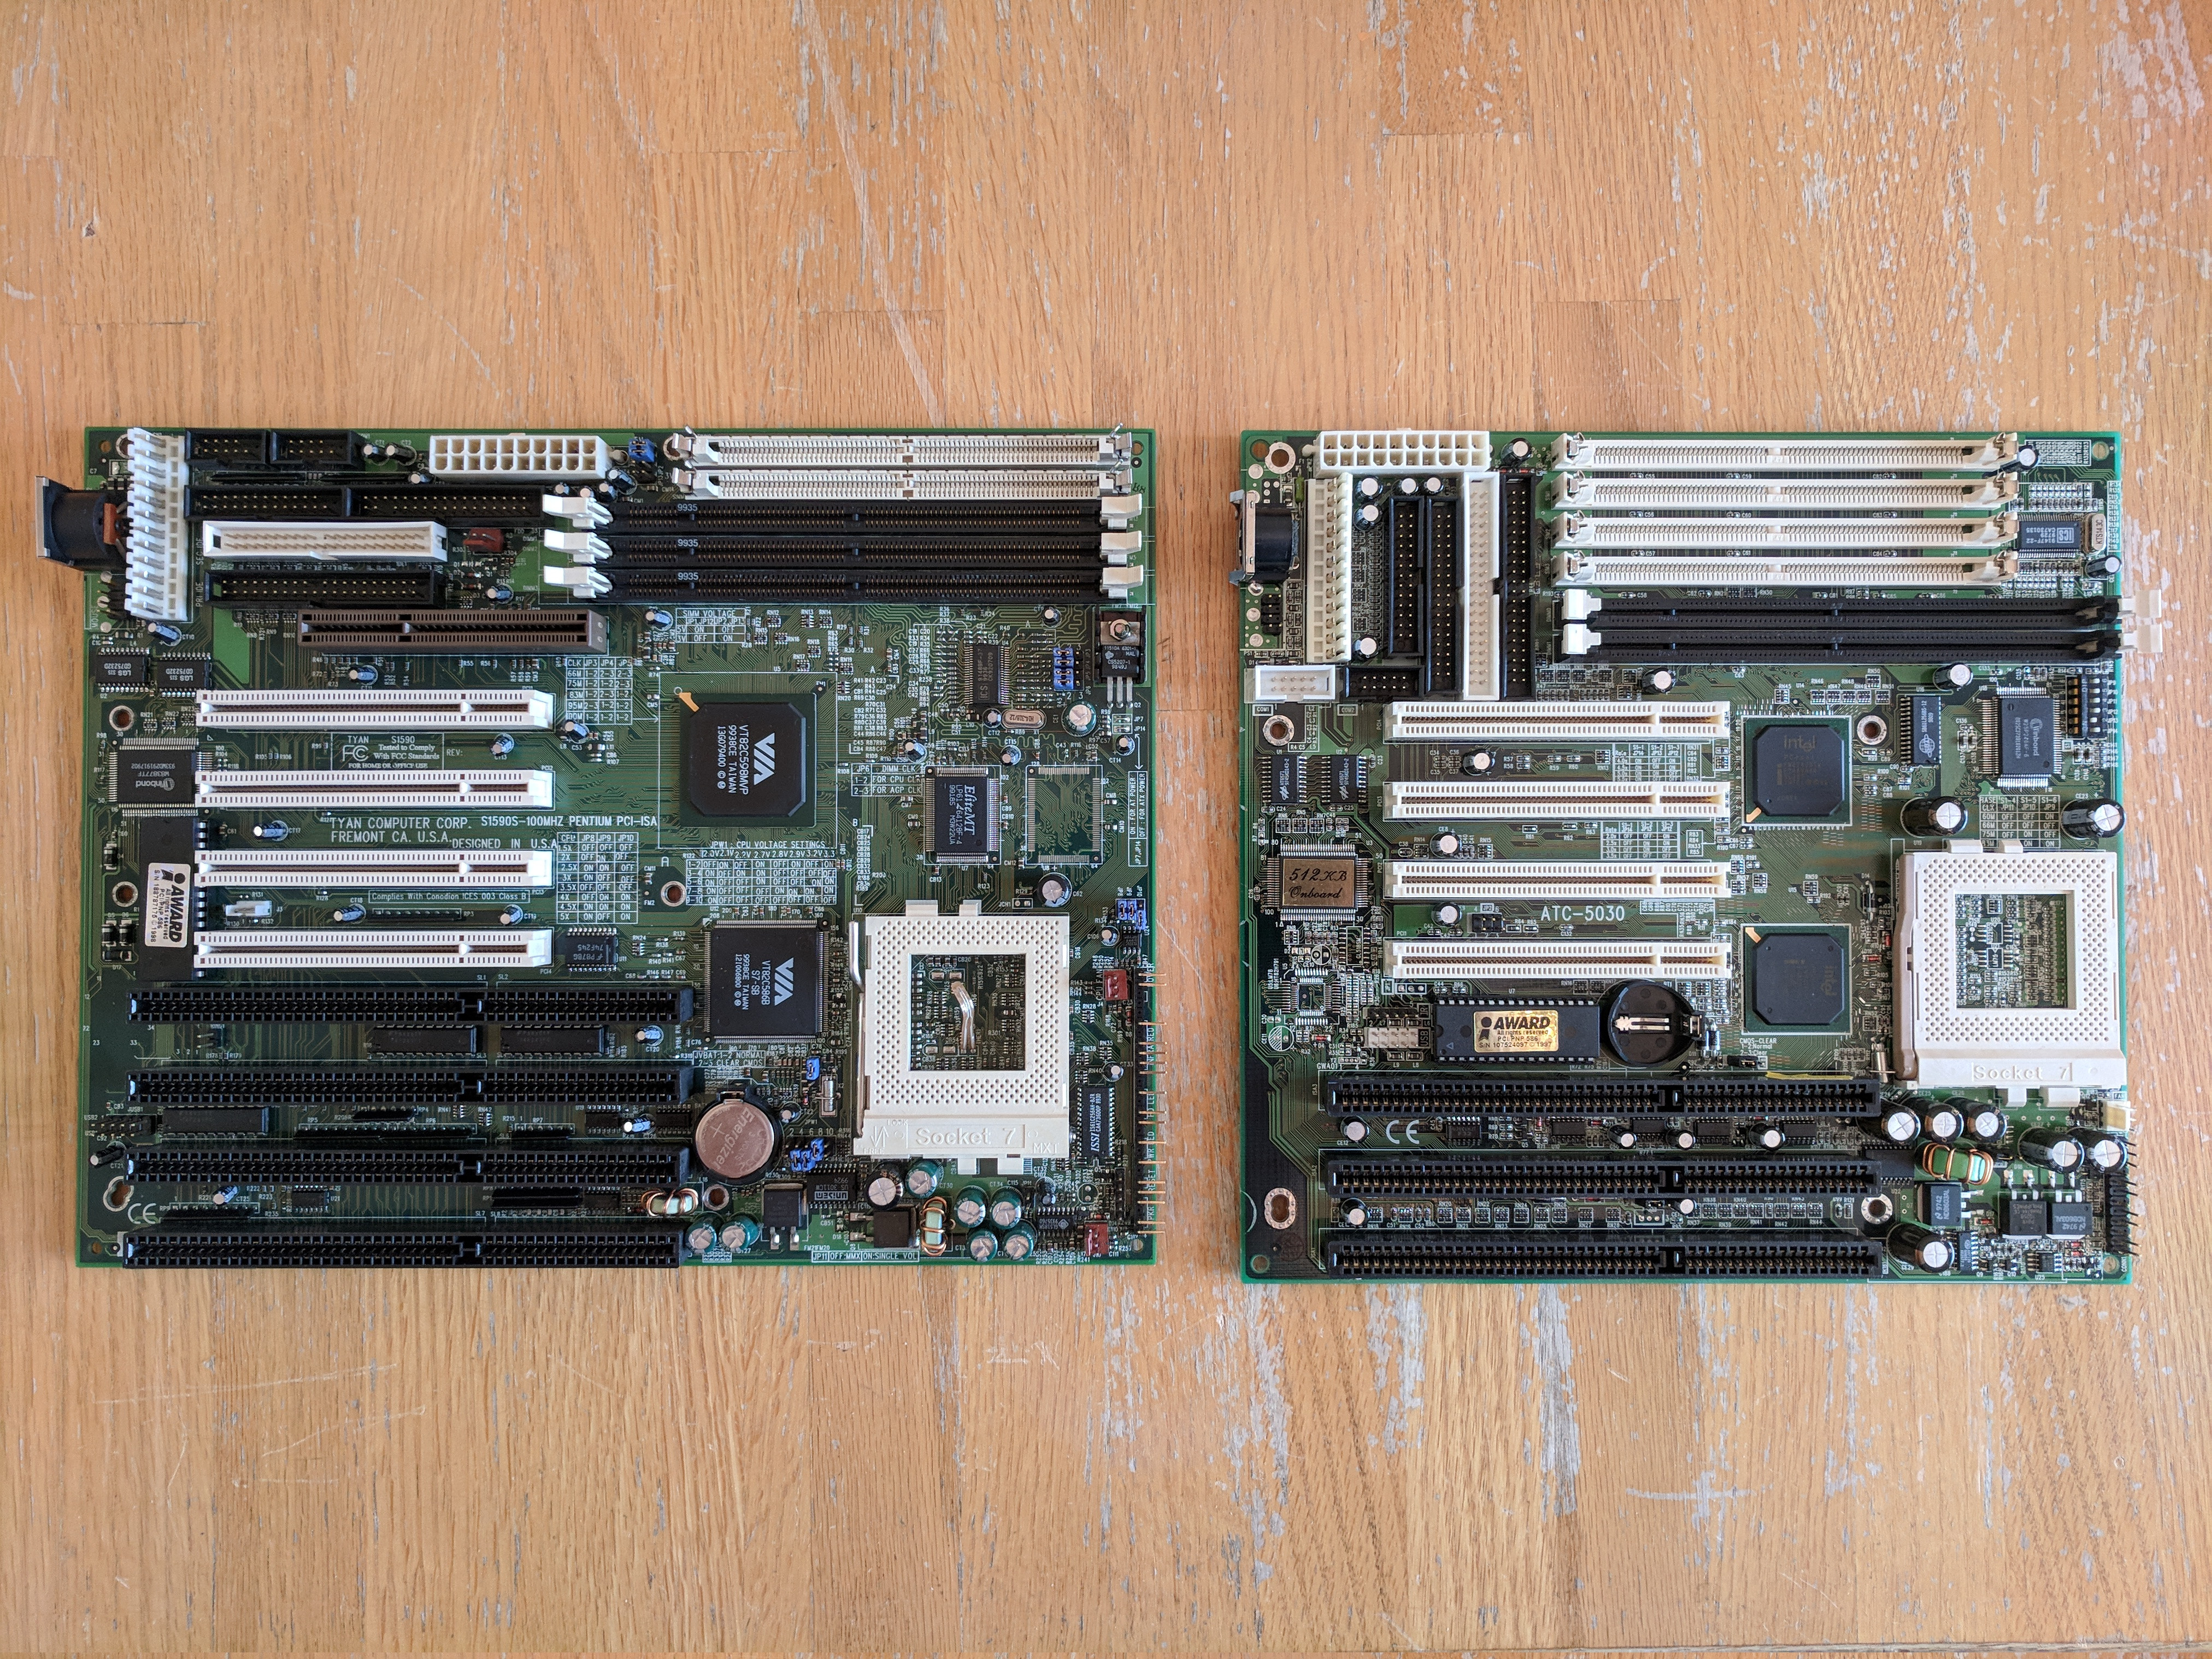
On the left, a Tyan S1590S and on the right, an Atrend ATC-5030. The Tyan board is actually a "Super" Socket 7 motherboard using the Via MVP chipset. This supports AGP (though, early AGP implementations on these boards was not very good), faster front-side bus (FSB) speeds like 100MHz, and is actually a great fit for AMD K6-2 and K6-III processors. Plus the sheer number of expansion ports available on this motherboard is actually quite odd for the AT form-factor. It is quite a packed motherboard, really. The Atrend motherboard on the other hand, is a mostly "normal" Socket 7 motherboard using an Intel 430TX chipset. Later Socket 7 processors such as the aforementioned AMD ones can still be used with this motherboard, but not at the faster FSB speeds support by Super Socket 7 motherboards.
What I like about both of these motherboards is the positioning of the PCI and ISA slots with respect to the CPU socket's location. At least a couple of long PCI and ISA cards can be used and won't get in the way of the CPU once a heatsink and fan are installed. This is really important for AT form-factor motherboards as they are a fair bit more constrained for space then the larger ATX form-factor Socket 7 motherboards were. A whole lot of Socket 7 motherboards either cut back on the number of PCI and/or ISA slots and/or have the CPU socket positioned so that you cannot install long / full-length PCI or ISA cards.
The Tyan S1590S is what I ended up going with here as it has the largest number of customization options available, making future "tinkering" and swapping out of different components possible.
It is worth mentioning that the inclusion of an AGP slot on this motherboard is not really that useful to me with the case I am using, due to it's position on the motherboard. With the size of a baby AT case, and how all of the I/O connectors are right by the AGP slot, it means that area will be really crowded. The last thing I would want is a graphics card right there with bunched up bits of IDE cables hanging on it. Really, to utilize the AGP slot on this motherboard, you'd probably want to use a slightly bigger case.
CPU
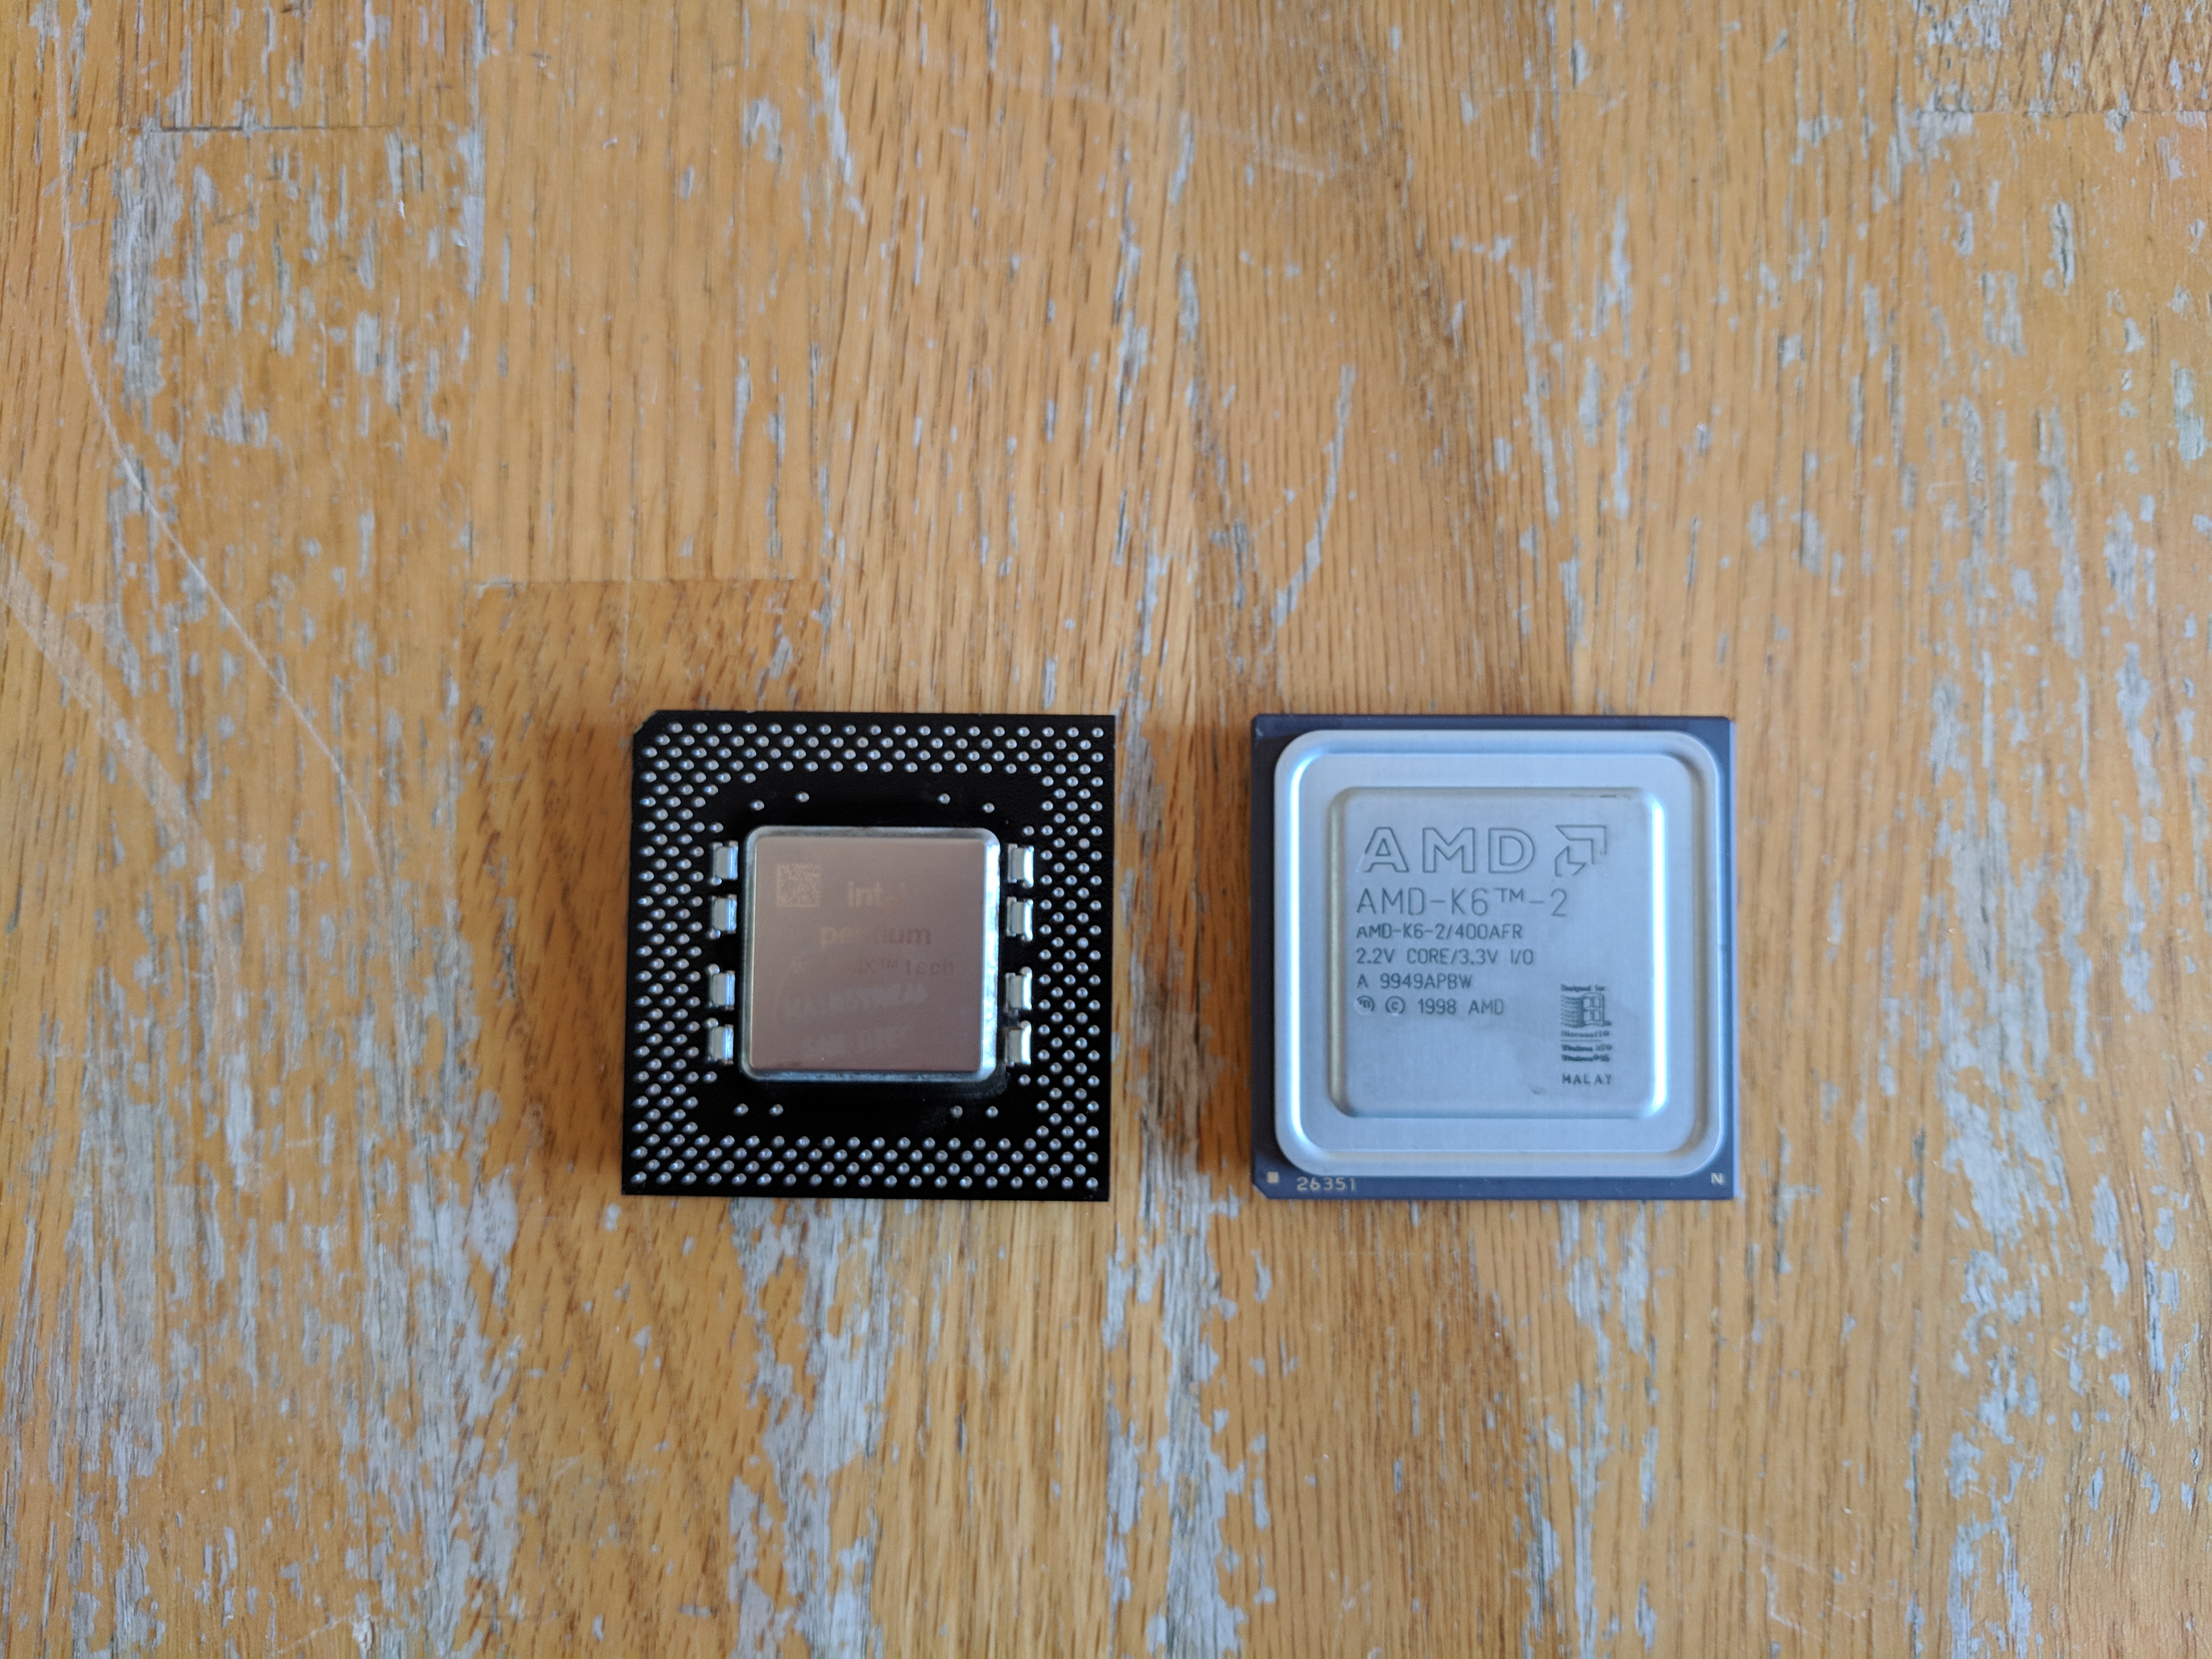
The two choices I had for a Socket 7 CPU are an Intel Pentium 233 MMX and an AMD K6-2 400. Most people would naturally go with the AMD K6-2, especially when using a Super Socket 7 motherboard as I am. I may one day use the K6-2 in this build, but for now I went with the Pentium 233 MMX. Why? Mostly nostalgia, really. While growing up, we never had any computers using AMD CPU's until 2001-ish when my dad got an AMD Duron for the computer my brother and I shared at the time. So I just figured I'd stick with something we actually had back then, and a Pentium 233 MMX actually fits that criteria perfectly. Normally these Pentium MMX CPUs would run at FSB speeds of 66MHz, but with the Tyan S1590S motherboard, I can bump that up to 100MHz easily (these Pentium MMX CPU's were well known for being good at overclocking) and run the CPU at a 2.5x multiplier for a final 250MHz clock speed. Not a huge overclock for the CPU itself, but the benefit of running the system bus at 100MHz is nice overall and a noticeable difference in Windows performance.
I did, for fun, try running with a 3.0x multiplier at 100MHz FSB (for a 300MHz CPU clock), just to see if it would work. But alas, the system would not POST with that configuration. Some people back in the day did this with Pentium 233MHz CPUs, but it was not guaranteed that your particular CPU would be able to run like this (I guess it depended on how good the particular manufacturing batch was or something).
At this time, Pentium CPUs were significantly better at floating-point operations then AMD K6 CPUs were. I think that integer performance might have been a bit better with later K6-2 and K6-III CPUs, but I might be wrong. AMD K6-2 CPUs and later supported AMD's 3DNow! extensions which gave developers access to a bunch of extra instructions to help boost performance. Both of these features of each CPU are interesting to me and so I can definitely see myself using both at different times in this build in the future.
But for the time being, I went with the Pentium 233 MMX.
Graphics
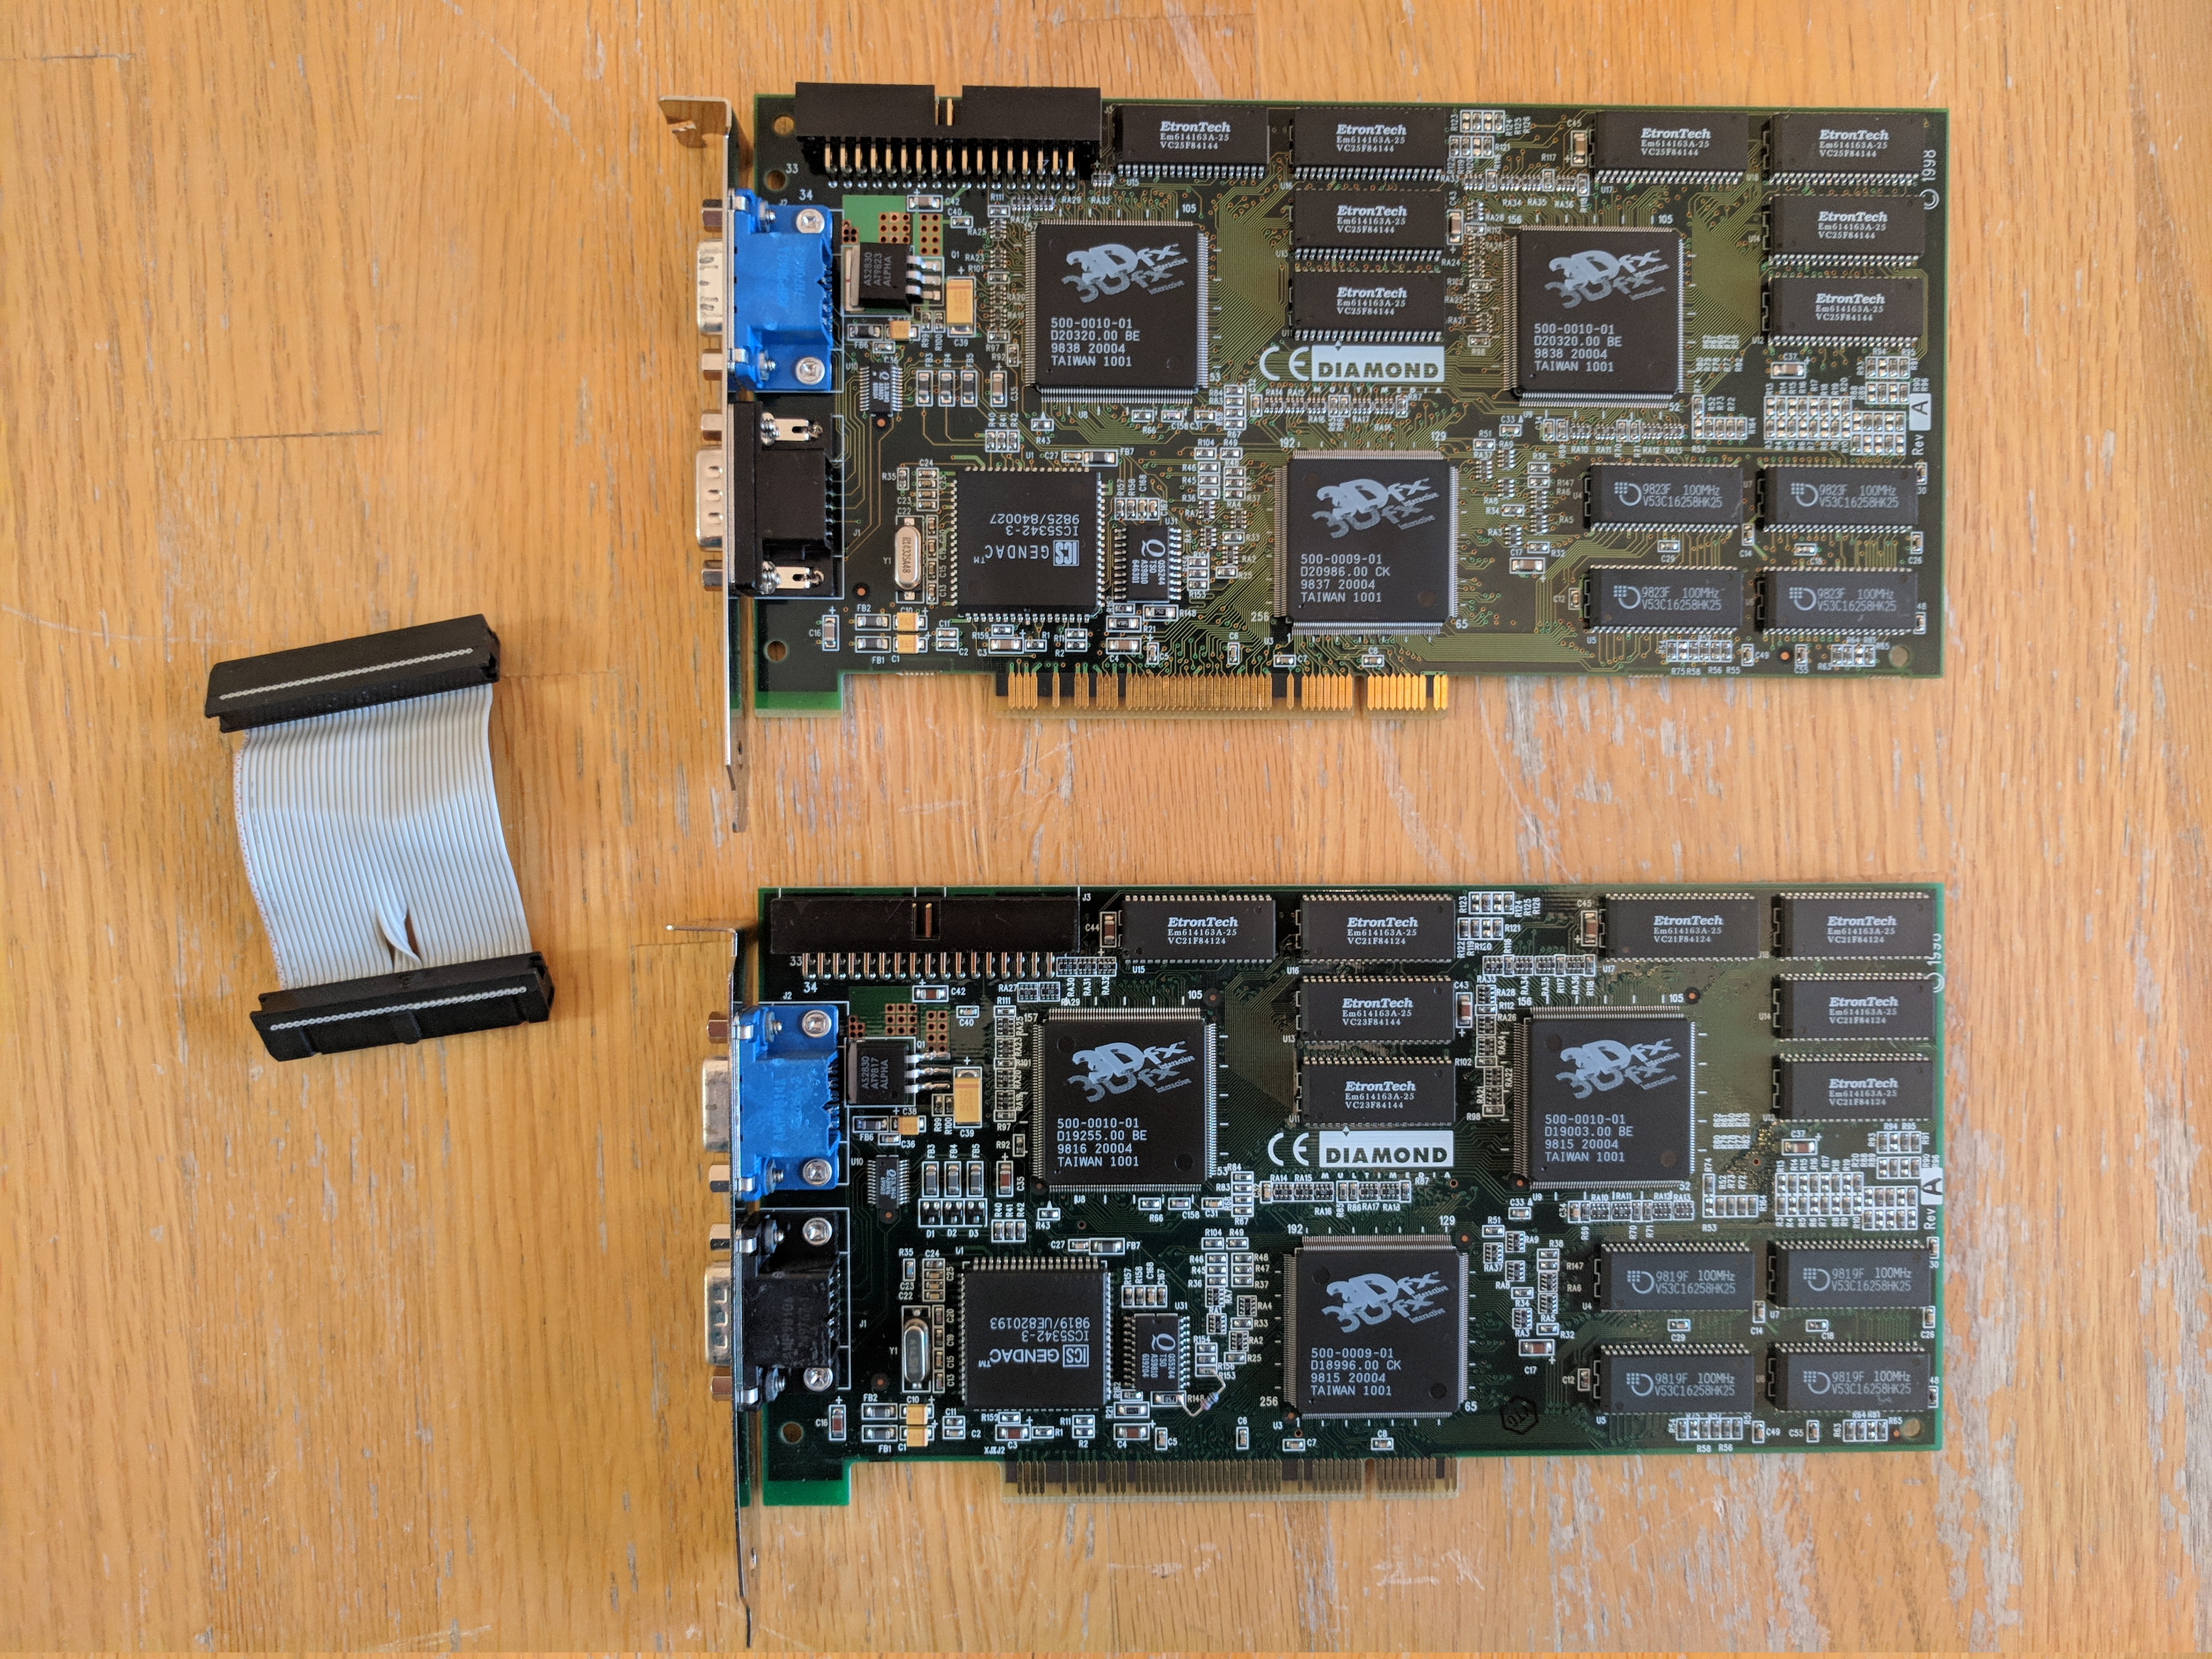
Anyone building a Socket 7 build today for fun is almost certainly going to pop one (or more) of 3dfx's Voodoo graphics card(s) into their build. If you knew anything about Socket 7 hardware before beginning to read this post, you were probably already expecting to see a 3Dfx Voodoo card make an appearance. And so I shall not disappoint you, and uncoincidentally, have two 3dfx Voodoo2 (Diamond, 12MB) cards on hand.
I can remember reading about these cards in issues of PC Gamer in 1998 as a kid back then. I would've loved to have one (or two) of these. They could be joined together in an SLI configuration to enable higher resolution modes to be used and also to help speed up operation. This is the original, bad-ass, SLI graphics card configuration! Sadly, I would never own one of these. The first 3D graphics accelerator we got back then was a Diamond Stealth III S540, 32MB AGP card for our AMD Duron computer a few years later. And we got that card when it was already old news (primarily because it was a budget card already, so I imagine my dad was able to buy it for quite cheap).
Anything 3dfx-branded is expensive nowadays. And I will not even talk about the ridiculous prices that Voodoo5 cards go for. However, I did not let these prices stop me from getting these two cards. I still kind of want to get an original Voodoo card also, but that can wait. Apparently there are some slight differences in compatibility (some older DOS games that supported 3dfx acceleration worked best with a Voodoo1 from what I've read).
I didn't buy these both at once, figuring that I probably didn't care much about the SLI capability. Eventually though, I was curious and grabbed the second one too. And then I installed them both and had the SLI configuration up and running and tried it out ... and ... meh. No real improvement. This makes sense when you think about it though. The Voodoo2 came out in 1998. The Pentium 233 MMX CPU was the last Socket 7 Intel Pentium desktop CPU and released in 1997. By 1998 (when the Voodoo2 was available), Pentium II CPUs were the latest and greatest. So, it makes sense that for some of the more demanding titles for 1998 (e.g. Quake II, or Unreal), that the Voodoo2 cards would be bottle-necked by the slower CPU. The Voodoo2 processor scaling project by Phil, over at Phil's Computer Lab, definitely shows this. You basically need a faster Pentium II to really see the benefits of SLI. All that an SLI configuration really does for a computer with a Pentium 233 MMX CPU, is allow higher resolutions to be used (like 1024x768). Even a Voodoo2 card maxed out with 12MB was only able to run at 800x600 by itself.
As a result of this, I ended up only going with a single Voodoo2 card in my build. This also has the benefit of keeping the temperature down inside the case while the computer is running. An important consideration when using a baby AT case which does not have a rear exhaust fan.
Voodoo2 cards (like the original Voodoo1 cards) only handled 3D graphics though. They used a VGA passthrough cable that you connected to a second graphics card your computer had to handle 2D graphics. You'd then plug your monitor into the second VGA port on the Voodoo card. I had a few options for the secondary graphics card:
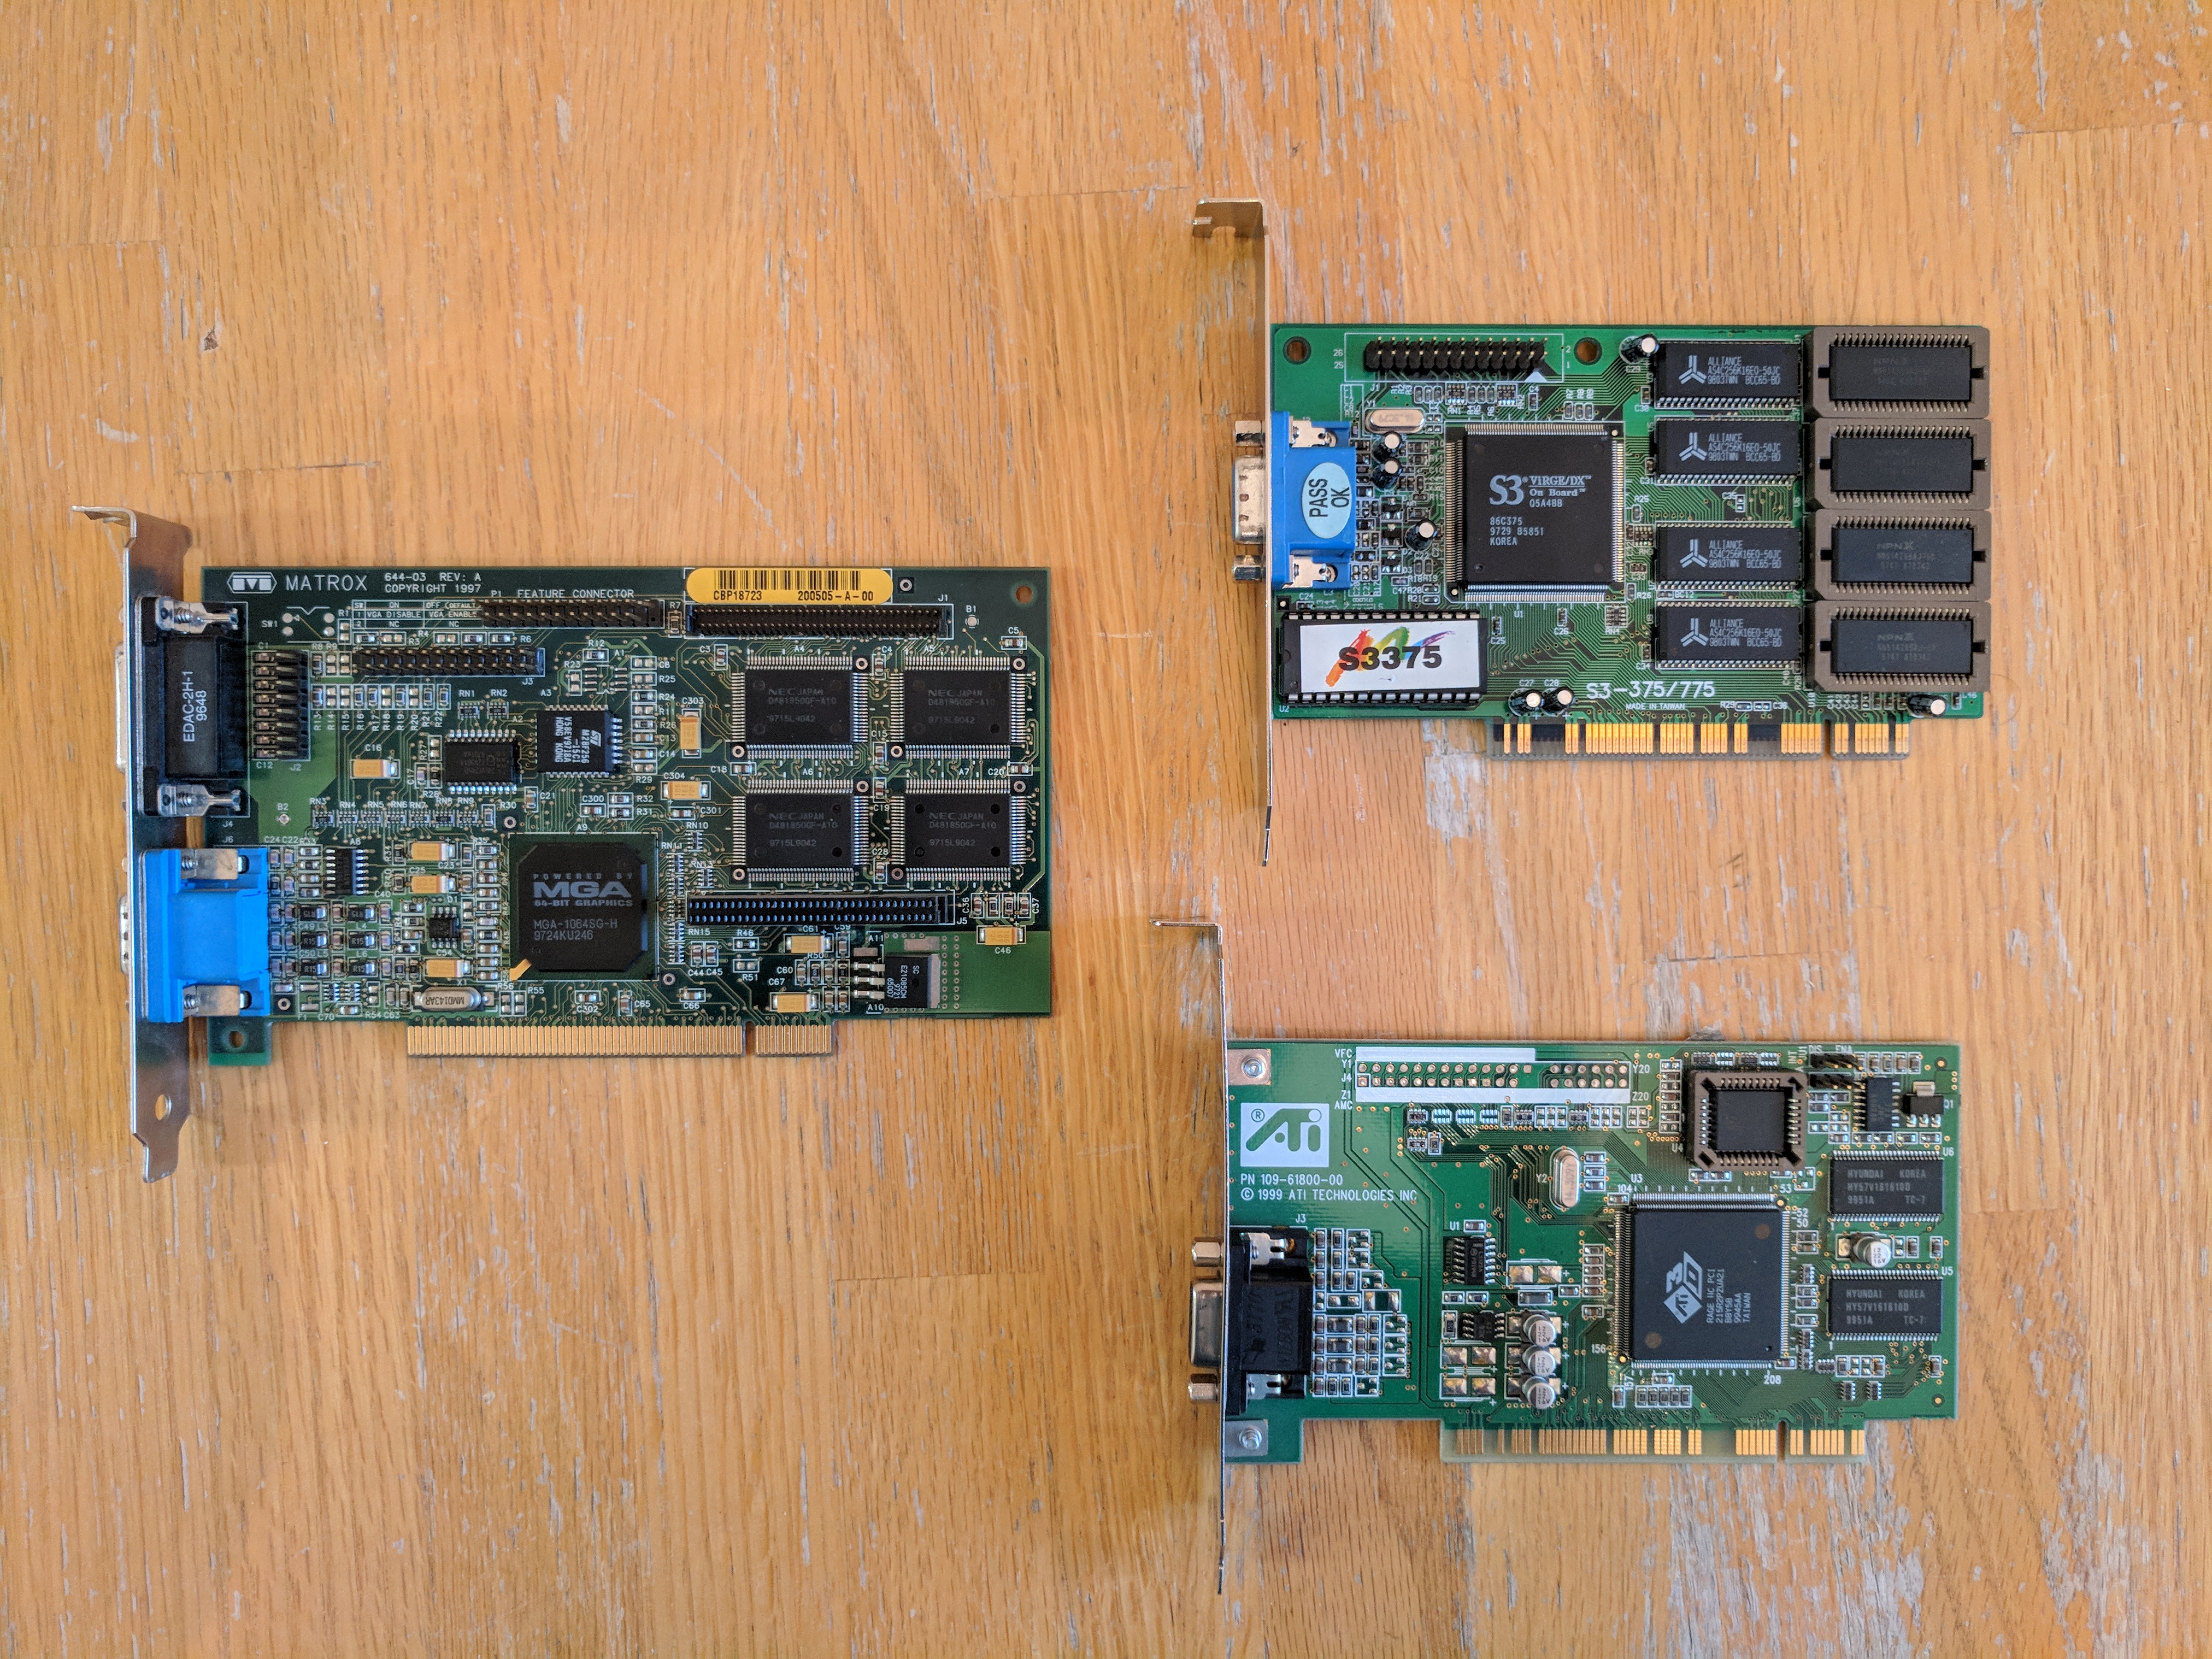
Here we have a Matrox Mystique 220, an S3 ViRGE/DX and an ATI Rage 3D. I've not ever used an ATI card from this era, and I've never really read the greatest things about them. They always seem to have some issues with DOS compatibility. S3 cards on the other hand always seem to have excellent DOS compatibility. However, ViRGE cards in particular seemed to be hit or miss with regards to the VGA output quality. I've heard people complain about the colours not looking as "vibrant" as other cards. However, I had used this particular S3 ViRGE card already and had no complaints about it's quality. Matrox cards seem to be generally well-regarded as a choice to pair with a Voodoo and I'd never used one of them, so this was the choice I went with in the end just to try something a bit different. It does have a few DOS compatibility problems, but for 98%+ of DOS games it is totally fine. If I end up running into any issues myself, I will just swap in the S3 card.
Let me just take a moment here again to blab about 3dfx Voodoo graphics just a little bit more. Out of the box, they enable this filtering effect when being used to render 3D scenes (now that I think about it, I am unsure if this is a feature unique to games utilizing 3dfx's Glide API or not). There is a way to turn this filter off, but most people back then would've been playing games with it on. It's a fairly unique effect actually and I personally think it looks best on a CRT monitor. Click the below screenshot for a 3x zoom.
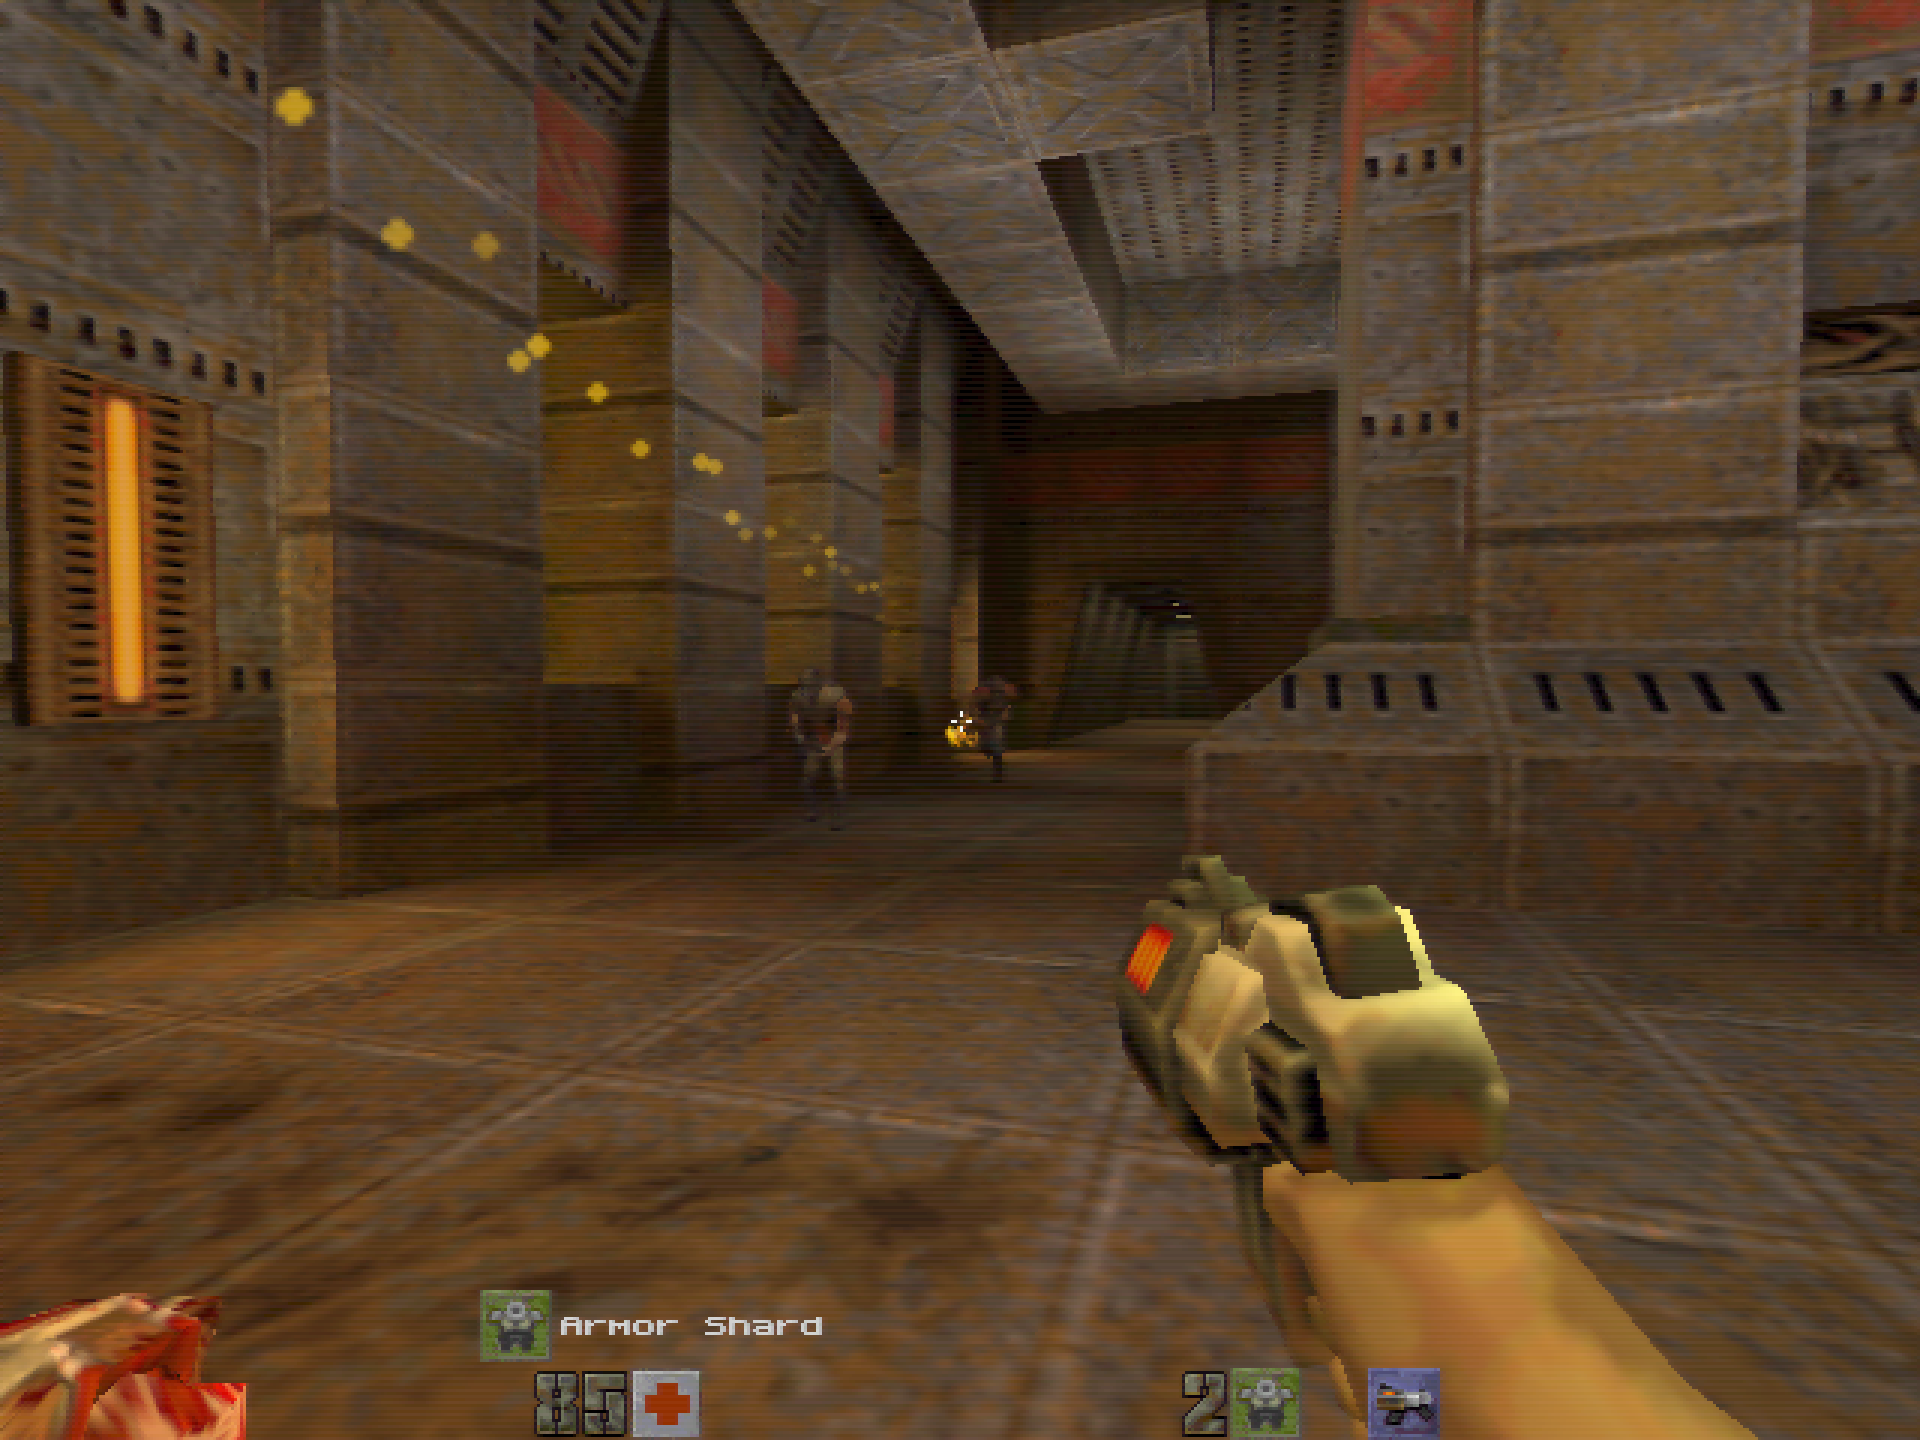
You can see that there's a kind of scanline type of effect throughout the image, but it's easiest to spot in the darker areas of that screenshot. I'm not sure if that scanline effect was actually intended or if it's just a side-effect of the filtering that the card is doing, but it's definitely a unique look. I never saw a 3dfx Voodoo card in action for myself as a kid, only just saw screenshots in magazines and such. But seeing it for myself, and its little quirks (such as this filtering)... it's kind of grown on me actually.
Audio
One of the things that fascinates me about 80's and 90's computing is the wide variety of audio hardware. After the early/mid 2000's the majority of people just use whatever audio hardware is built into their motherboard and it usually sounds excellent and you just don't even give it a second thought. I'm by no means an audiophile, but even still, I do enjoy the abundance of choice for sound cards in older computer builds.
I have quite a few choices available (and this actually isn't even all of the ones I have on hand, heh).
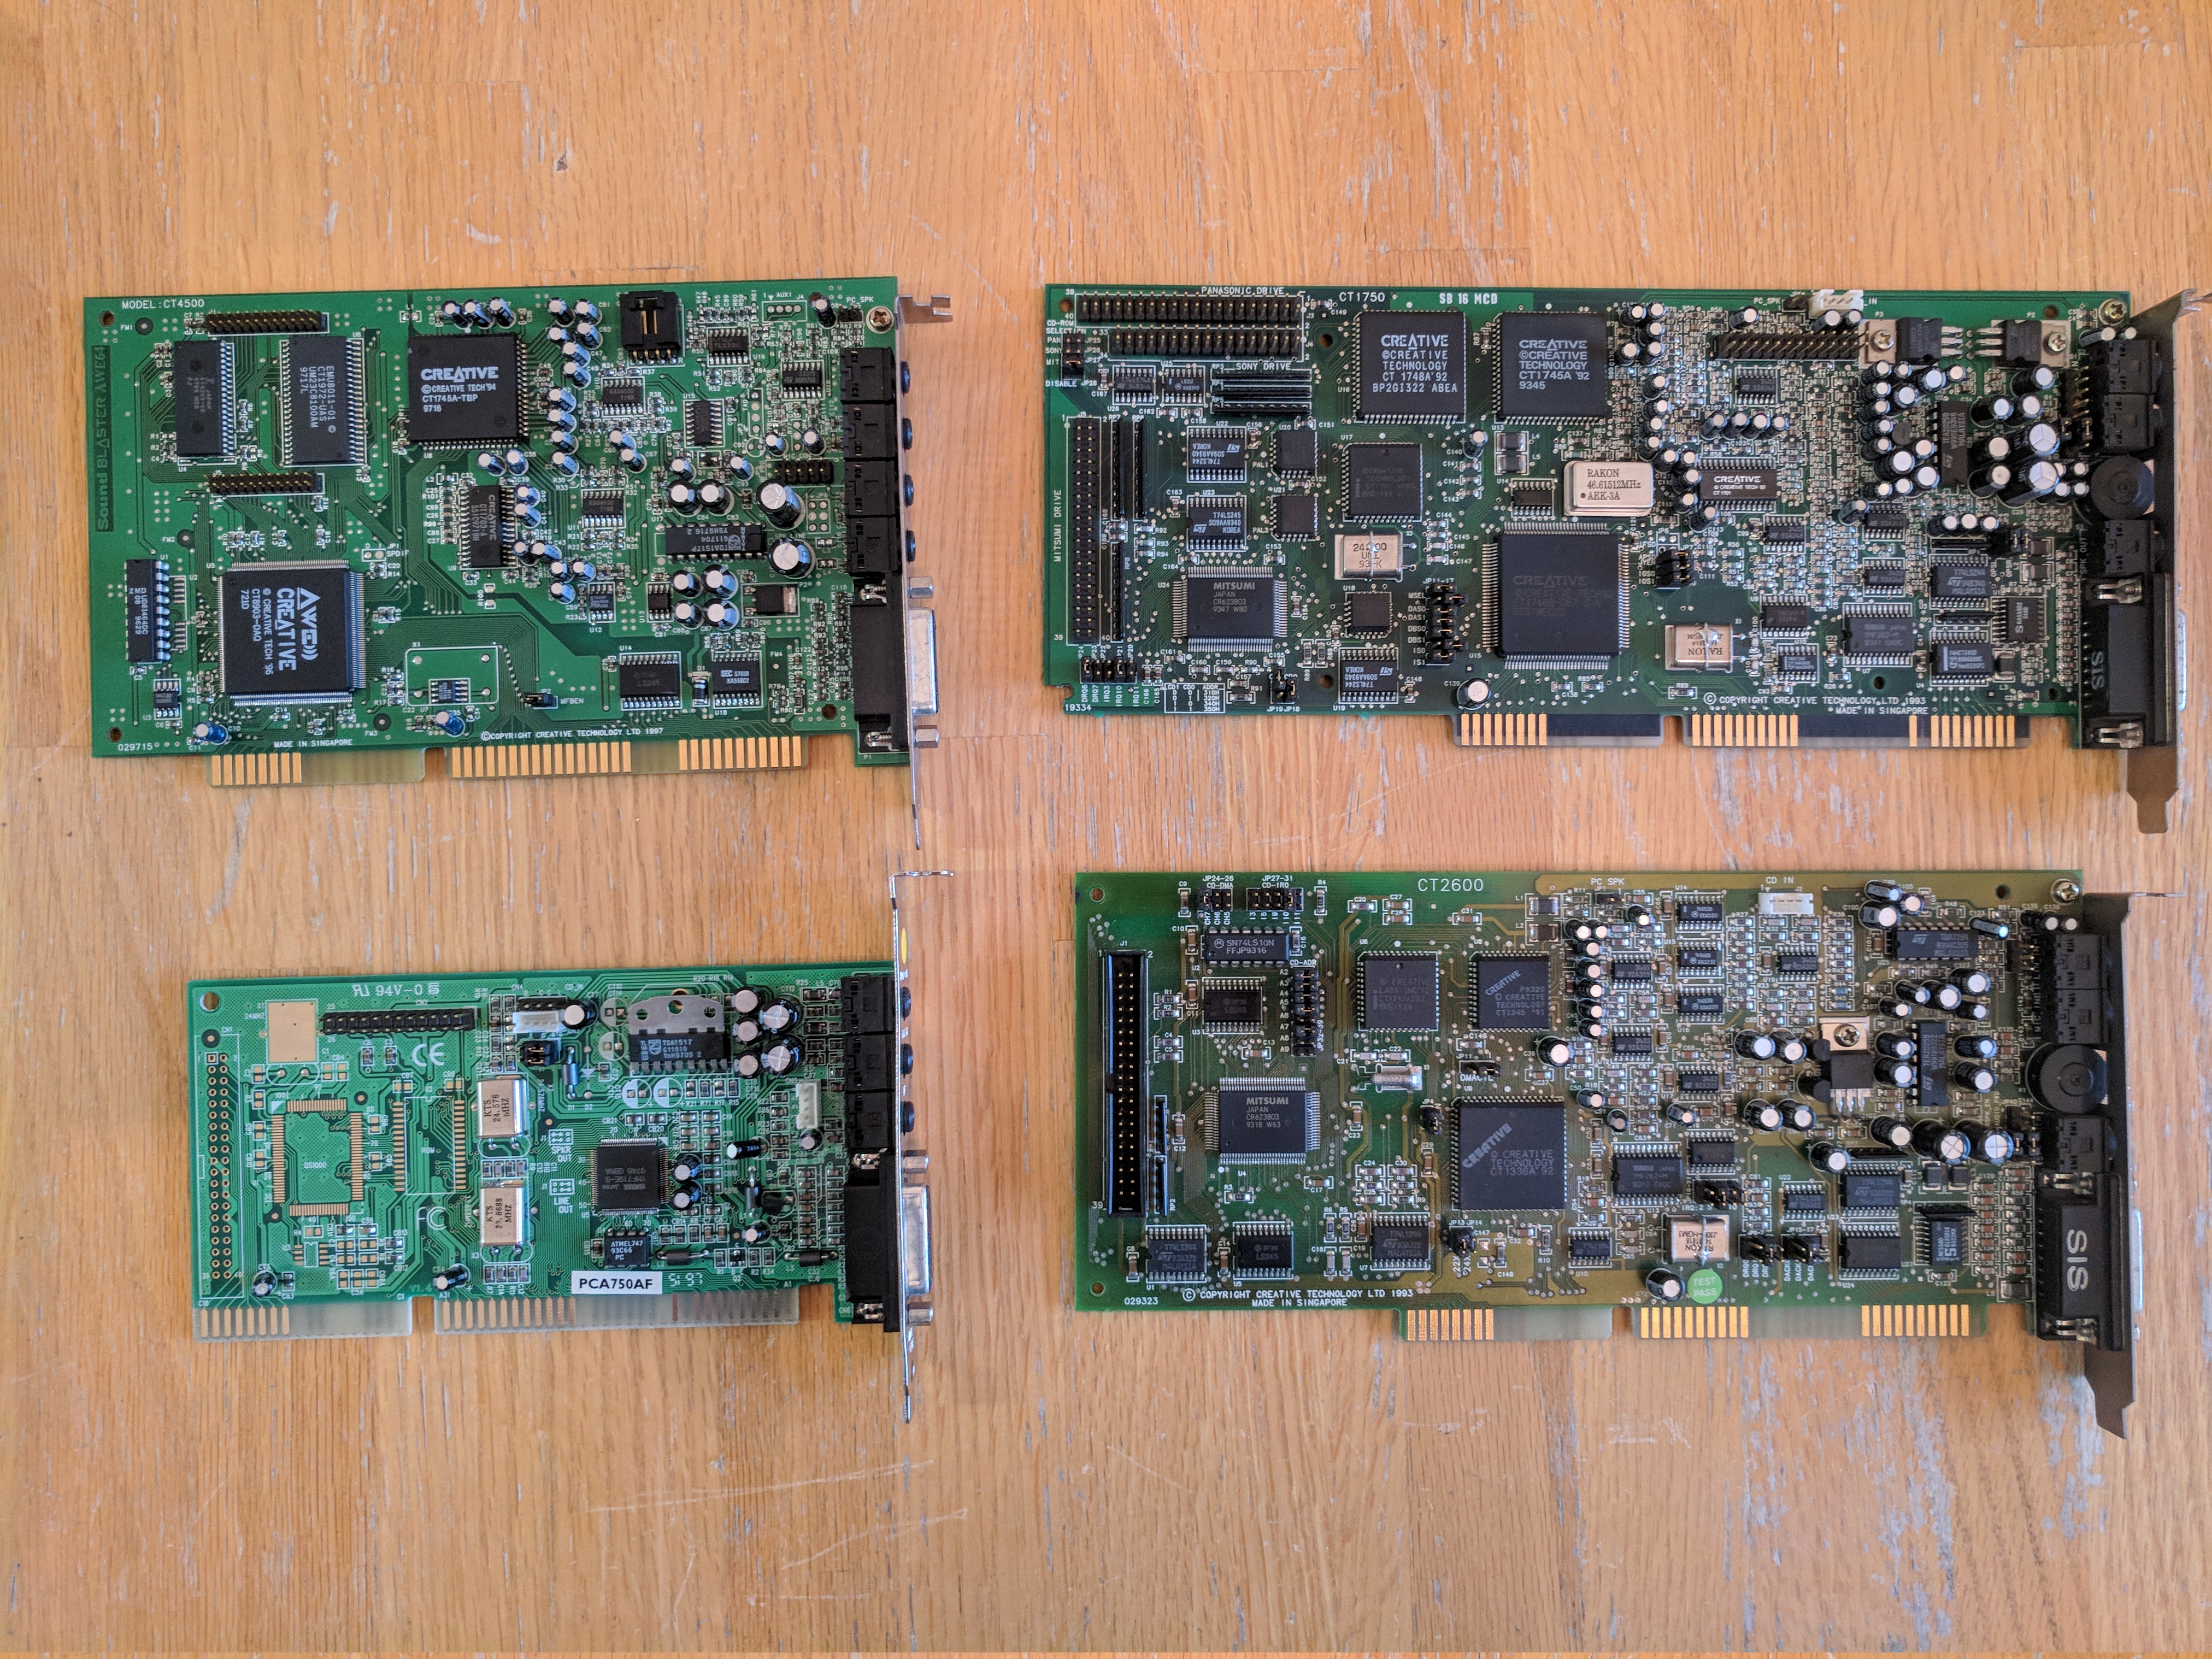
- Sound Blaster AWE64 CT4500
- Sound Blaster 16 CT1750 (DSP 4.05)
- Sound Blaster Pro 2 CT2600
- Philips PCA750AF YMF719E-S
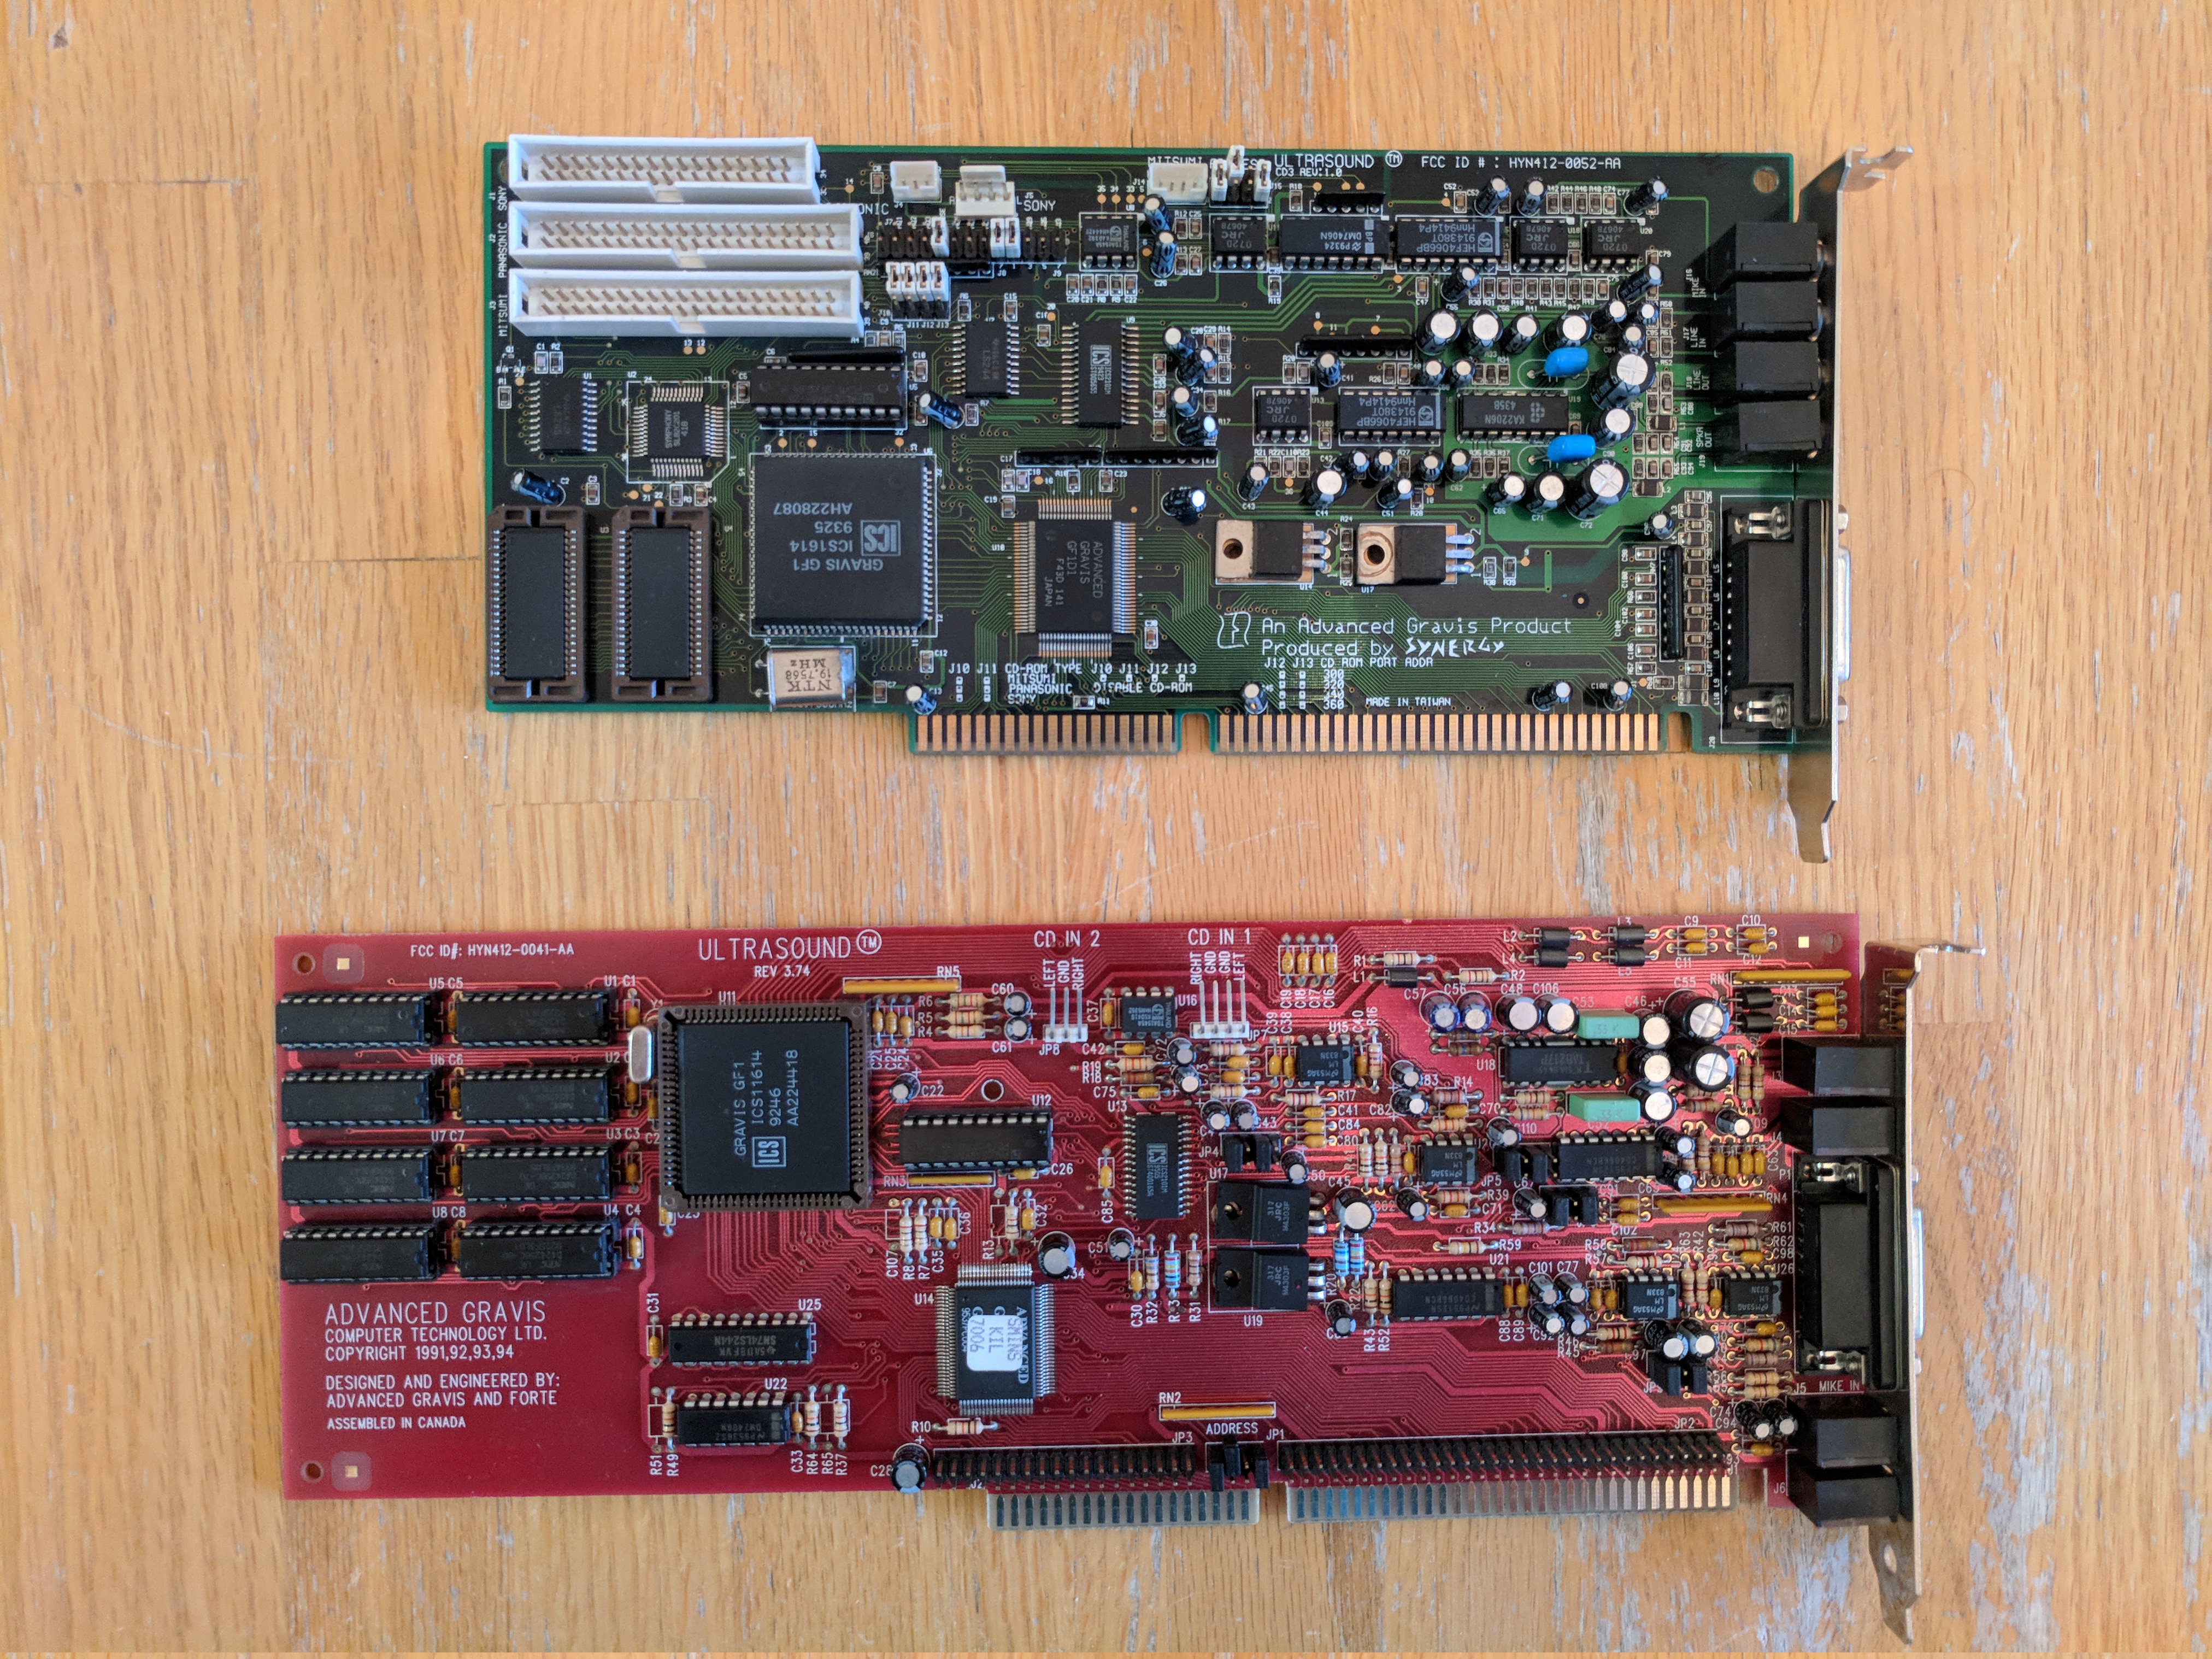
- Gravis Ultrasound Classic 3.74
- Gravis Ultrasound CD3 ("clone" card by Synergy)
Because this build will still be used for DOS games, a Gravis Ultrasound of some sort is a must-include for me. Gravis Ultrasound cards are quite expensive today. I already had one for my 486 build (the red one pictured above), and decided I wanted to get a second one for this build. They are both long cards and so it is worth considering which one fits best in which build so I put them both up for consideration here, and the remaining one will go back into my 486. I ended up putting the Gravis Ultrasound CD3 in this build. It's not quite as long as the Classic card and I liked how that fit in this build's case a bit better. I set the jumpers to disable the CD interfaces though. They aren't useful to me since my motherboard has two IDE ports on-board and they'd probably just end up causing hardware conflicts under DOS if left enabled.
That leaves the choice of Sound Blaster-compatible card. Each of these four have their own pros and cons. The AWE64 is not "true Yamaha OPL" but just an integrated emulation/clone. The Sound Blaster 16 sounds a bit "noisy" and has DSP clipping problems with certain titles (mostly I notice this in Wolfenstein 3D). However this card has the right DSP chip version (4.05) to avoid the infamous "hanging note" bug when also using the card for MPU-401 output. And it has a real Yamaha OPL chip. The Sound Blaster Pro 2 is a great sounding card for DOS titles, but maybe not the best choice for Windows games with higher quality audio assets. Also it does not support MPU-401 output via the gameport. The Philips YMF719 card is actually the best choice in my eyes with the least compromises. In fact, I cannot think of any compromises it makes when stacked up against these other choices. It has a real Yamaha OPL chip, the YMF719 which has great DOS and Windows support. It supports MPU-401 output via the gameport. And it does not suffer from the "hanging note" bug. Great all around, so I chose it.
For MPU-401 music, I will be using a Roland Sound Canvas SC-88VL that I was already using with my 486.
It is interesting having so much choice for MIDI music in DOS games. Sound Blaster's Yamaha OPL, Gravis Ultrasound, or Roland Sound Canvas. To my ears (and I imagine, most other people's ears too), the Roland Sound Canvas is the clear winner. But the Gravis Ultrasound also has quite a distinctive sound to it that I like. Plus several DOS games (e.g. One Must Fall 2097, Epic Pinball, Jazz Jackrabbit) support the Ultrasound directly, but do not offer MPU-401 support so an Ultrasound card definitely has it's own special place for use with DOS. The classic Yamaha OPL MIDI sound also cannot be forgotten (it is what most people will remember the clearest since it was probably all that they had when they were younger), but I will admit it is not my usual choice nowadays.
Gravis did ship Windows drivers for their Ultrasound cards. I did try this out myself not thinking anything of it, and
just installed drivers for both the Philips YMF719 and Ultrasound in Windows 95. This proved problematic as the
Ultrasound drivers wanted to control the typical Sound Blaster hardware resources (e.g. port 220h, IRQ 5/7, DMA 1) for
use with it's own Sound Blaster emulation support. I could not find any way to disable this in the driver, so I was
forced to uninstall it. Thankfully I am not interested in using the Ultrasound with Windows-specific software so this
is no problem to me. I can still play DOS titles from within Windows and use the Ultrasound for sound/music output
just fine (if I really wanted to launch DOS games this way that is), as long as the DOS ULTRINIT tool was run during
startup.
Final Components List
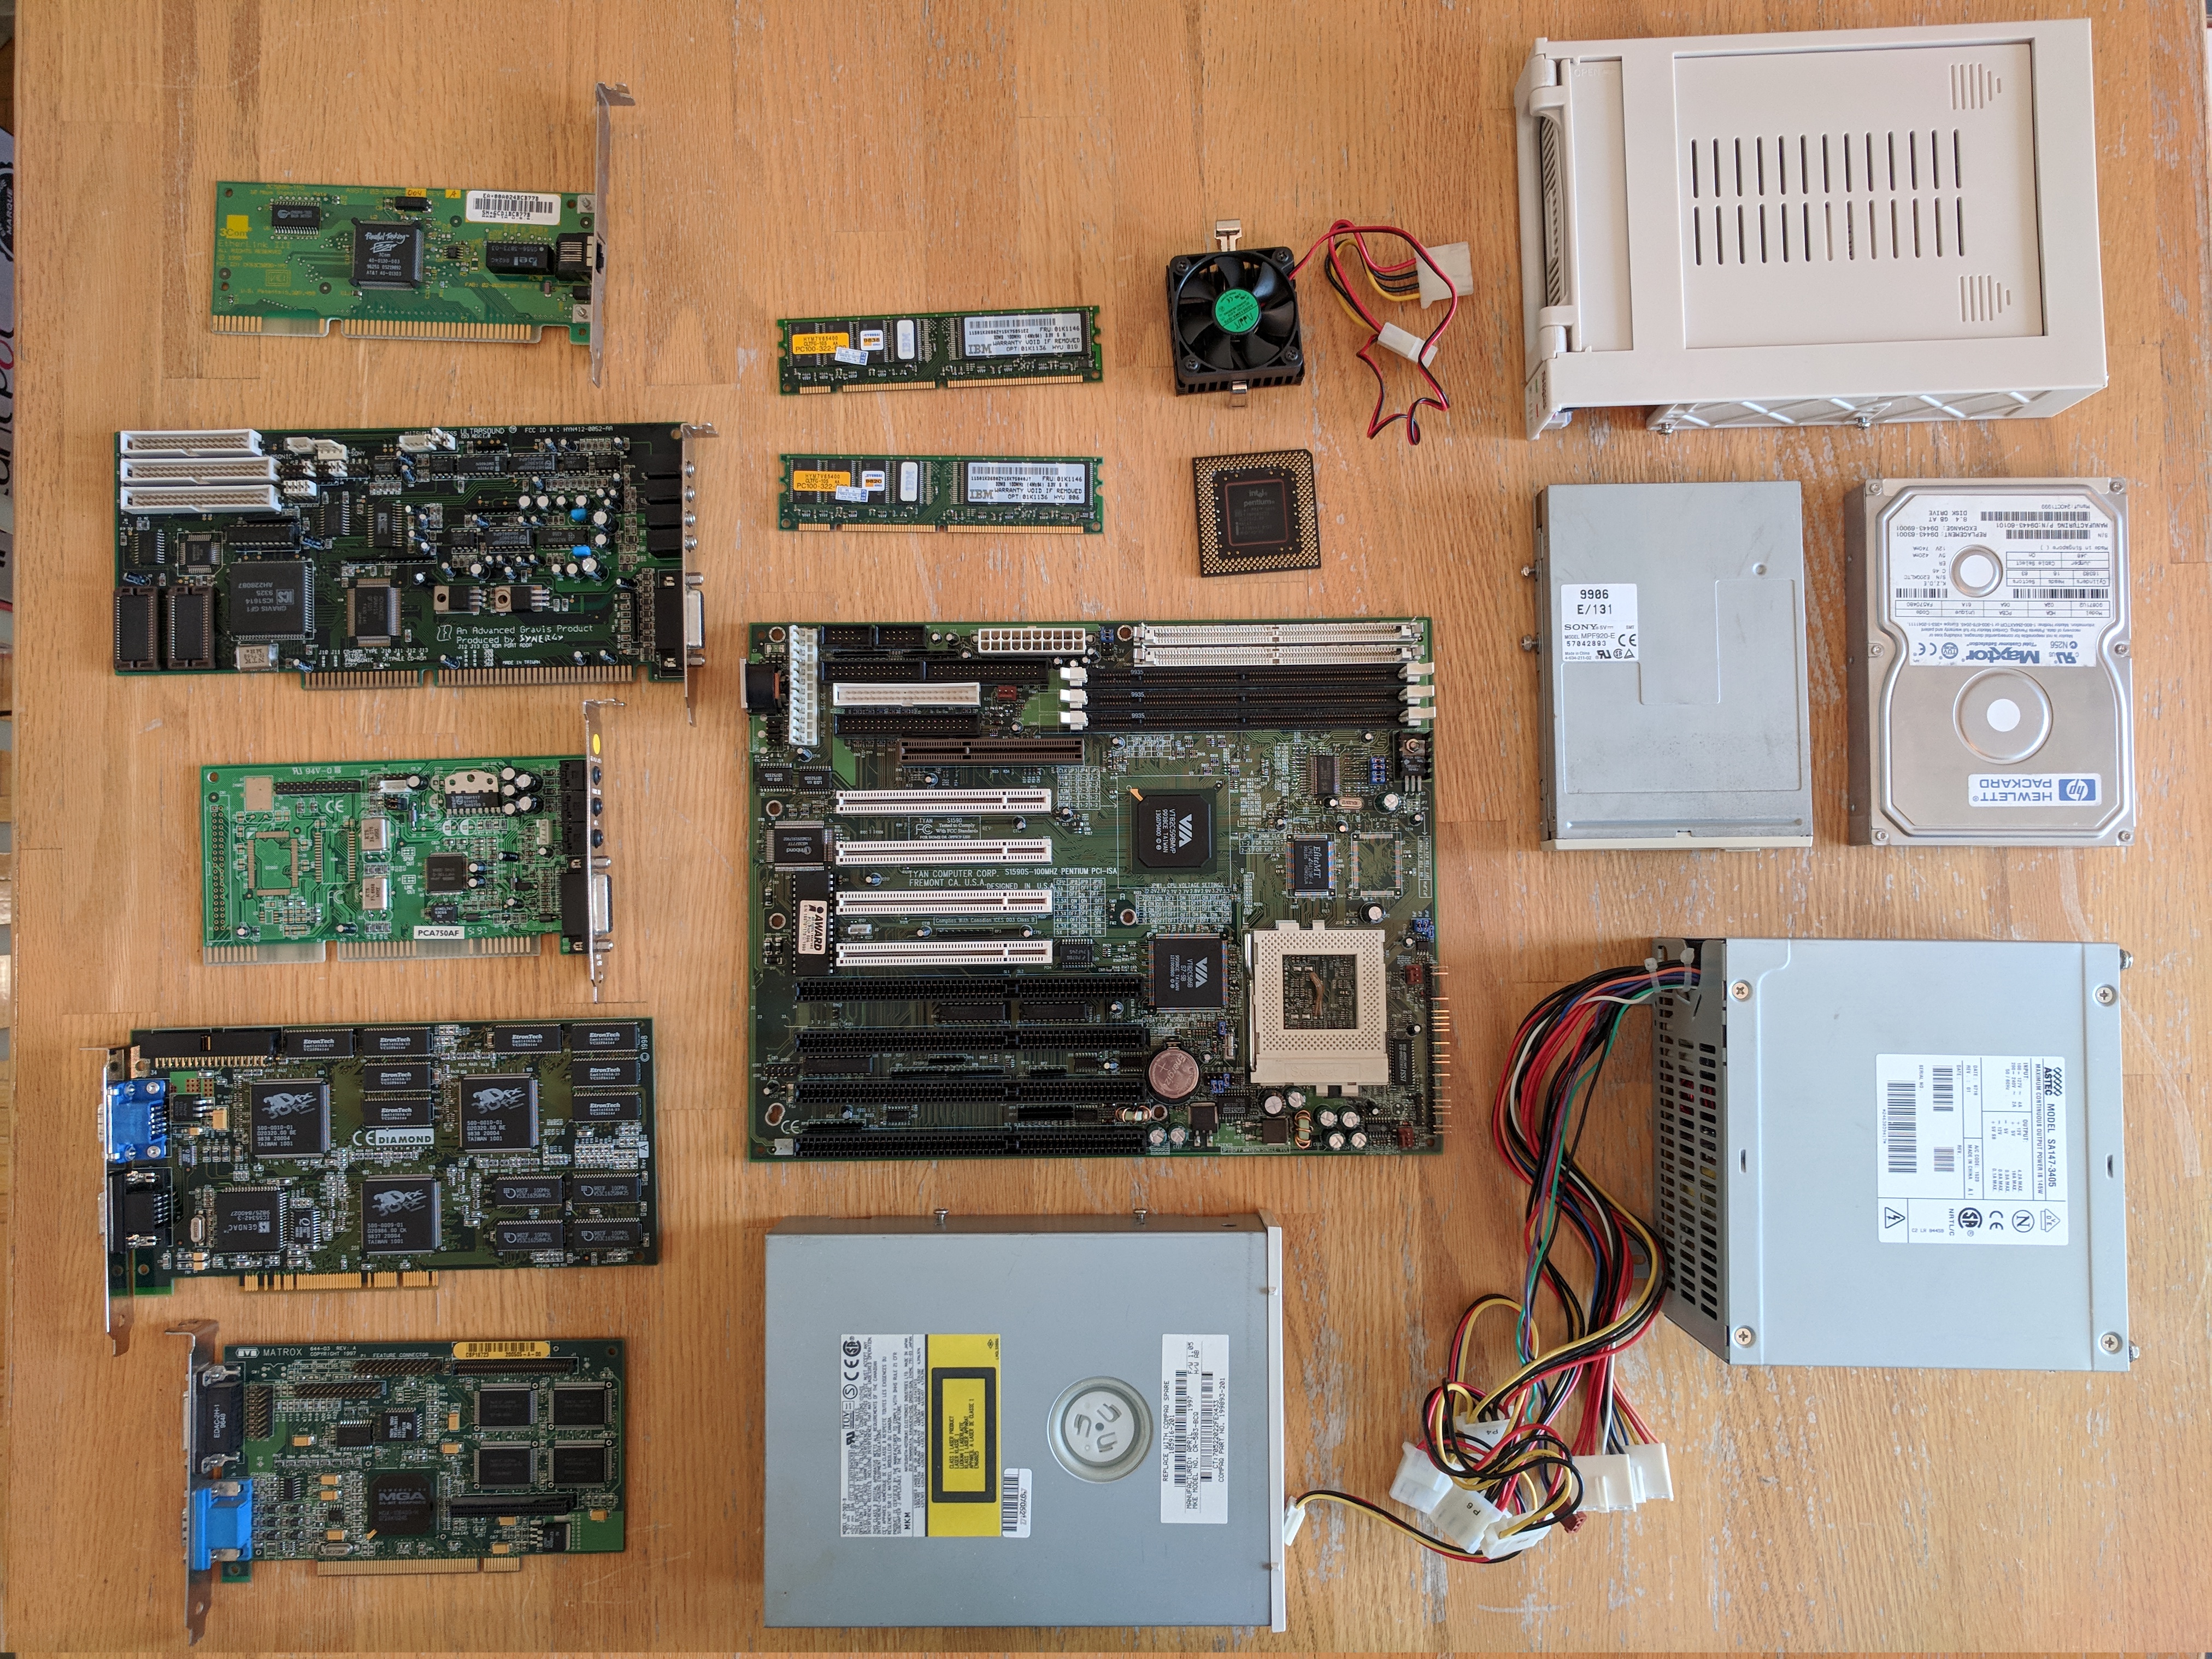
- CPU: Intel Pentium 233 MMX at 100MHz FSB with 2.5x multiplier (= 250MHz)
- Motherboard: Tyan S1590S
- RAM: 64MB (2x 32MB) PC100 (100MHz)
- Graphics: Diamond 3DFX Voodoo2 12MB and Matrox Mystique 220 4MB
- Audio: Philips PCA750AF YMF719E-S and Gravis Ultrasound CD3
- Network: 3Com EtherLink III 3C509B-TPO
- Hard Disk: Maxtor 8.4GB (within a ViPower Super Rack mobile rack enclosure)
- CD-ROM: Matsushita CR-583-BCQ 8x
- Floppy: Sony MPF920-E 1.44MB
- Power: Astec 145W AT
- OS: Windows 95C
The remaining choices are perhaps not quite as interesting and/or they were more "automatic" for me based on what I had or didn't have on-hand.
64MB of RAM was actually quite a lot for 1997/1998. This was a time when most people's computers were probably running at most 32MB, and probably even still a lot of people with 16-24MB. I could go higher as I have quite a lot of compatible RAM modules on hand and this motherboard supports more then 64MB, but I don't really see the point in putting in more.
For network connectivity, I really like using 3Com, 3C509 ISA cards specifically. These are very easy to set up in DOS
and Windows 95. Under DOS, you just need a copy of the Crynwr packet driver 3C509.COM (which you can get from
here, amongst other places). This packet
driver won't help you use things like Microsoft DOS networking tools though. Under Windows 95 it's even easier though.
The drivers for these cards are included out-of-the-box. You just have to make sure that TCP/IP networking support is
included during installation (by default it is not). Just a simple checkbox and you're done.
Internet connectivity is not so useful in general on an old computer like this. The modern web is basically unusable on Internet Explorer 3, or whatever other ancient web browser you might remember using. Newer SSL protocols in common use, and the fact that the majority of web sites these days are SSL-only means you'll just get generic connectivity errors in your ancient web browser because it doesn't understand the newer SSL versions. Even if it did that wouldn't help you much. Modern web development practices mean heavier single-page-app (SPA) style of development with megabytes of Javascript generating the page dynamically in many cases. And your run-of-the-mill ancient web browser will not support all these fancy Javascript things even if it wasn't so ridiculously slow at running it. Google searching is perhaps unsurprisingly still doable on Internet Explorer 3.
No, the real practical use for network connectivity on a "retro" computer such as this is for transferring files on a local network. With a 3C509 ISA network card I can, after a fresh install of Windows 95, begin immediately accessing files stored on the Linux HTPC on my local network running a Samba share (well, as long as authentication is not required) by simply navigating to "Network Neighbourhood" where after a short wait, an icon for my server will pop up once Windows 95 detects it. This can be used to copy across drivers and software of course, and so it is quite useful.
An 8.4GB IDE hard disk is perhaps a bit on the large-ish side for 1997/1998. But it is what I had on hand that was still in working order and is closest to what I feel is era-appropriate. I decided to use a mobile rack enclosure for it to keep it out of the way inside the already cramped baby AT case. And if it dies (due to age), it will be easy to swap out and replace with something like a CF card using a CF-to-IDE adapter (or one of my other remaining larger IDE hard drives... yeah I still have a stack of my old drives).
The particular CD-ROM drive I used is otherwise unremarkable, but was chosen because it looks like the same style as the ones I always remember having back when I was younger. And it really didn't feel right putting in something much faster such as a 48x speed drive (even though those would probably be cheaper then this... once you can call something "vintage" suddenly the price rises, no matter what it is ...).
The Astec PSU I used here is the only AT power supply I had that was not already in use. There are some manufacturers still making brand new AT power supplies though. Such as the Athena AP-AT30 300W AT PSU which I actually use in my 486 computer. This Astec PSU is actually "new old stock" which I picked up for cheap locally when I went to go pick up an old Microsoft PS/2 mouse I had bought off eBay. When I arrived, the guy asked if I was interested in anything else and let me take a look at what he had. I had driven to an address he had provided me which was the address of his father's old business that he was cleaning out finally and had all kinds of unsold merchandise. I had originally bought just a single Microsoft PS/2 mouse, but ended up leaving with the Astec PSU, a second mouse, and a couple games, all of this stuff brand new old stock and he only asked me for $20 extra. Not bad I thought, heh. Anyway, the PSU is still in great working order, though I would like to replace the capacitors on it soon just to be safe (they look fine so far though).
One thing that bothers me, in 2019, when reading retro-computing forums where people share writeups and pictures about their builds is how many people doing Socket 7 builds install Windows 98 instead of Windows 95. On a classic Pentium system, Windows 95 performs quite noticeably faster then Windows 98. And again, on a classic Pentium system, you are not likely running software that will only work on Windows 98. I mean, you could be, but I think your typical retro-computing-forum-visitor today in 2019 who is building a retro computer to play games (by far the most likely use), is probably not going to need Windows 98. I don't understand why people intentionally reduce their performance for no other real noticeable gain. Unless you just really prefer Windows 98 over Windows 95 I guess. *shrug*. I suppose this is being true to the era. I can remember people would do this all the time whenever a new version of Windows would come out, and install it on slower hardware even though it sometimes killed performance (relatively speaking of course).
Anyway, Windows 95C is a great choice for this type of build in my opinion. Performance-wise, it just flies. It is very stable. And it includes early USB support, but I don't really care about that as I'm not using USB in this build at all.
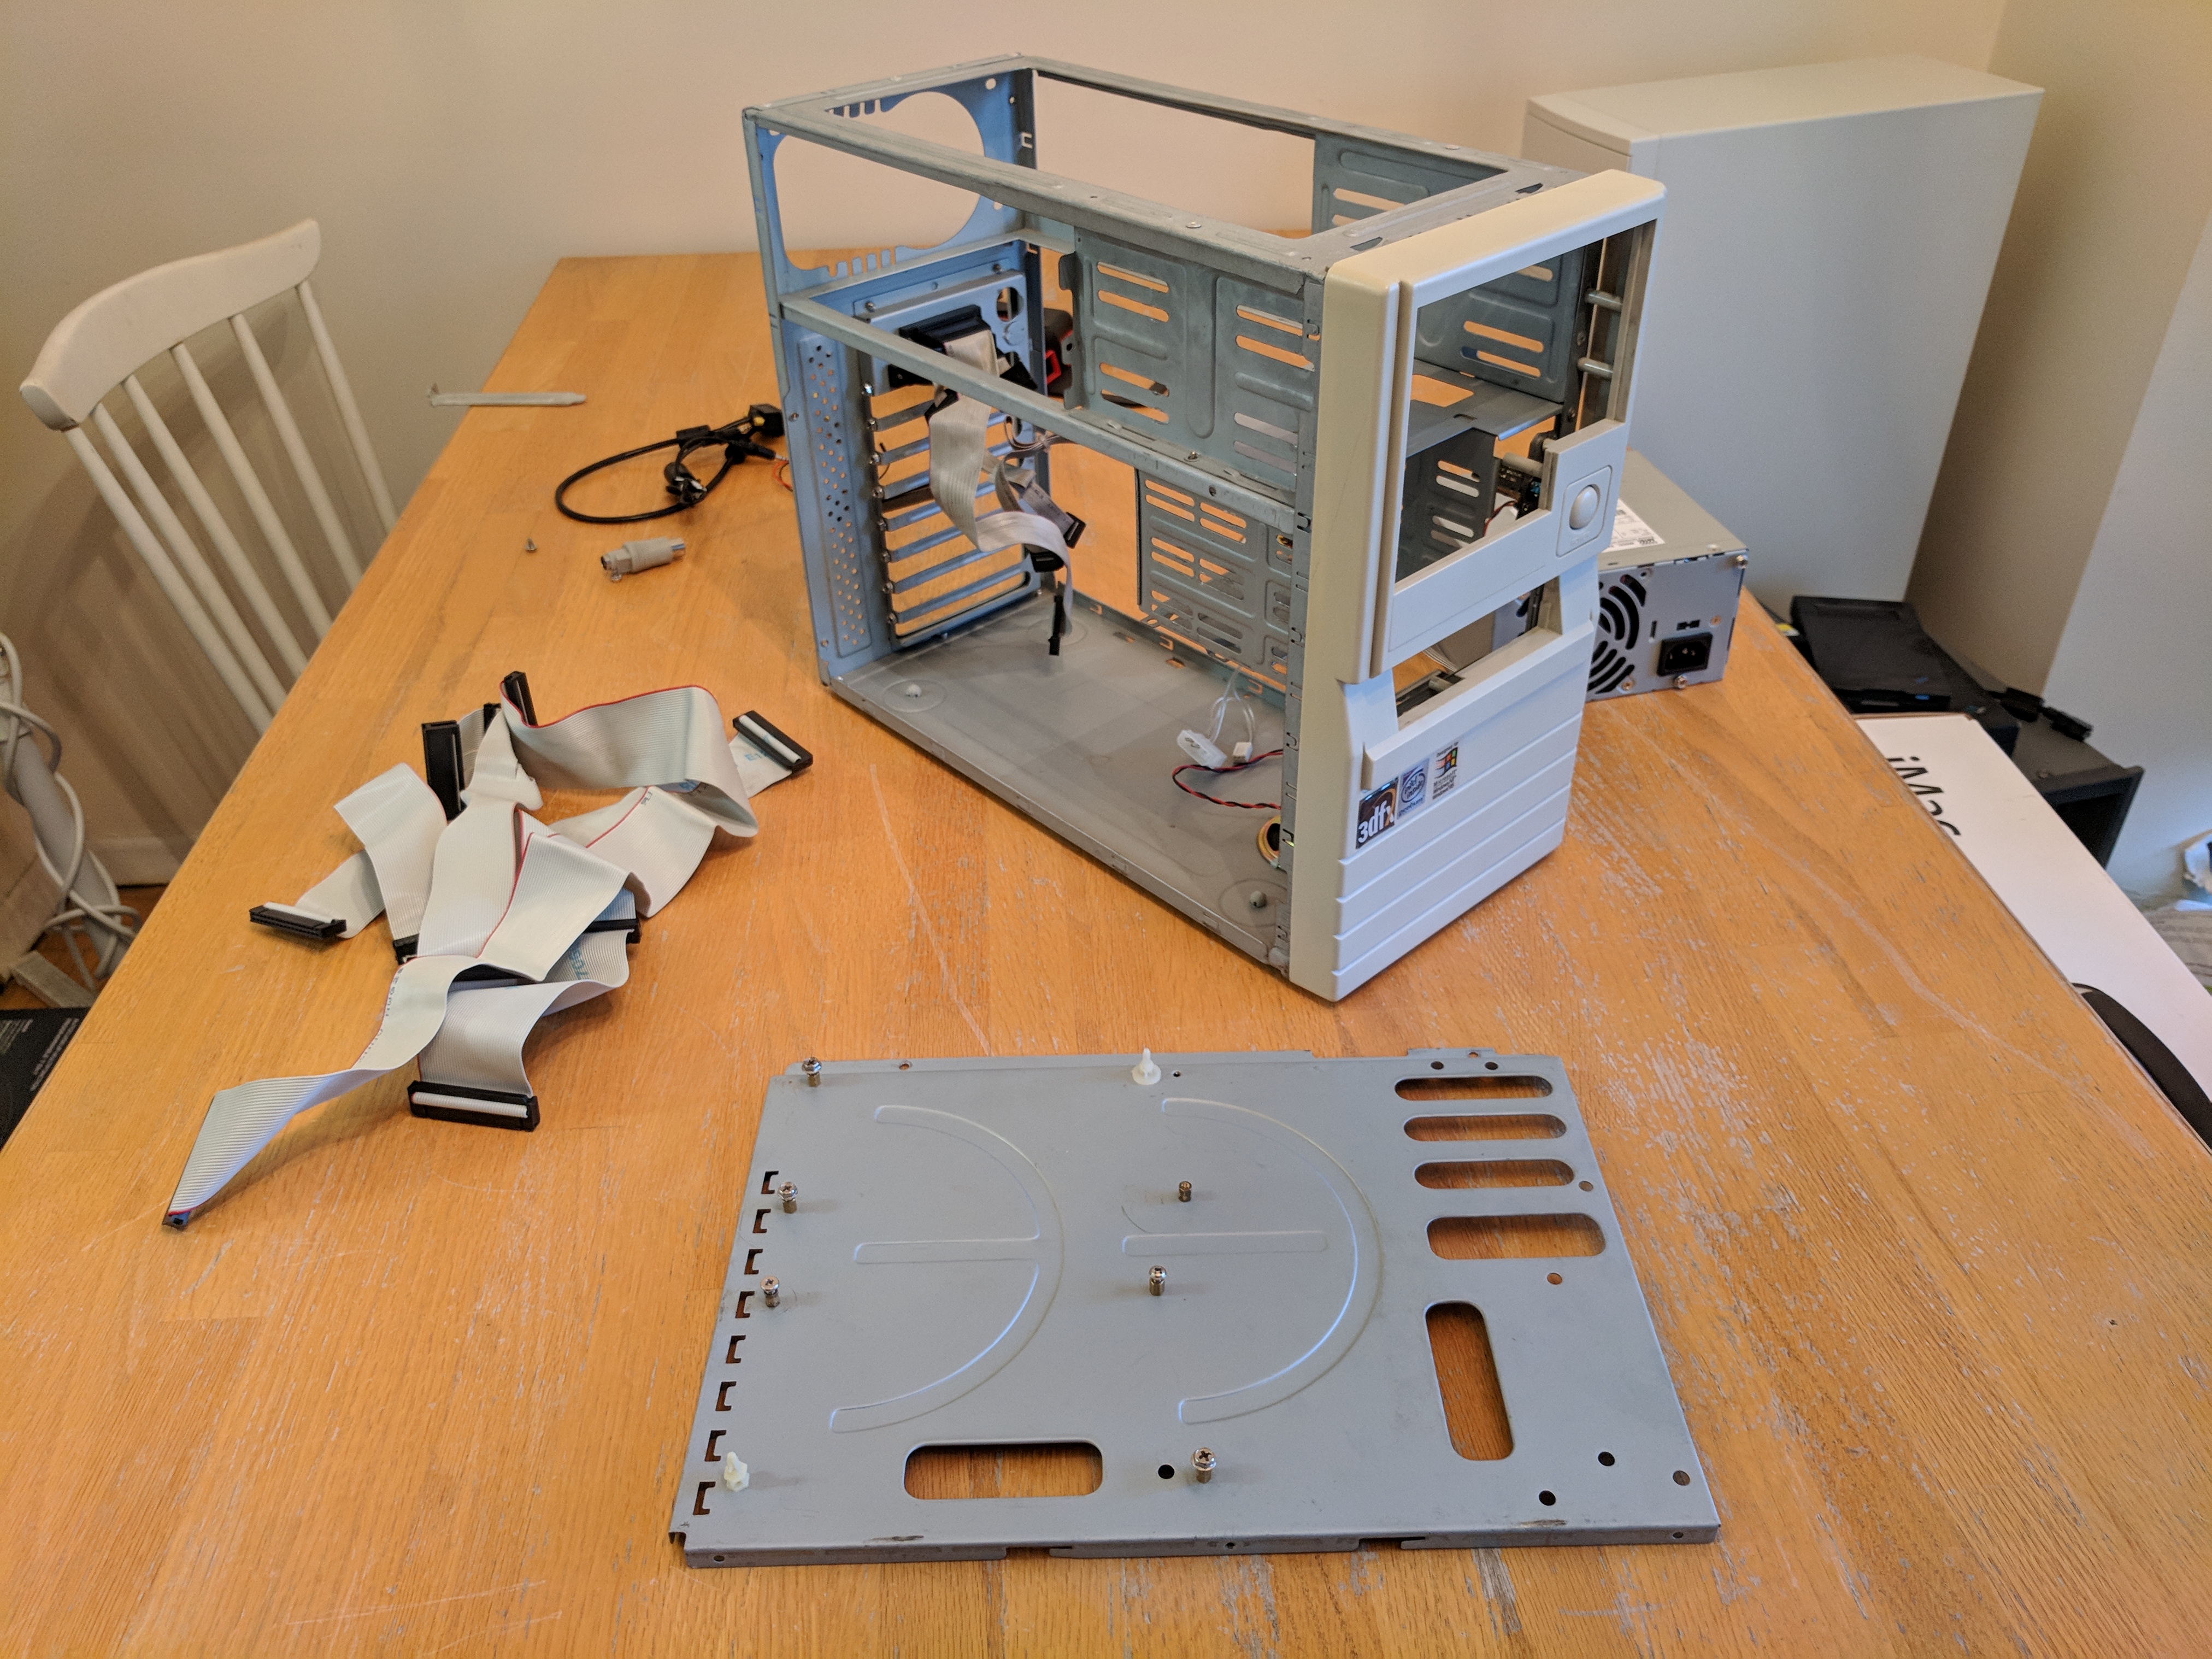
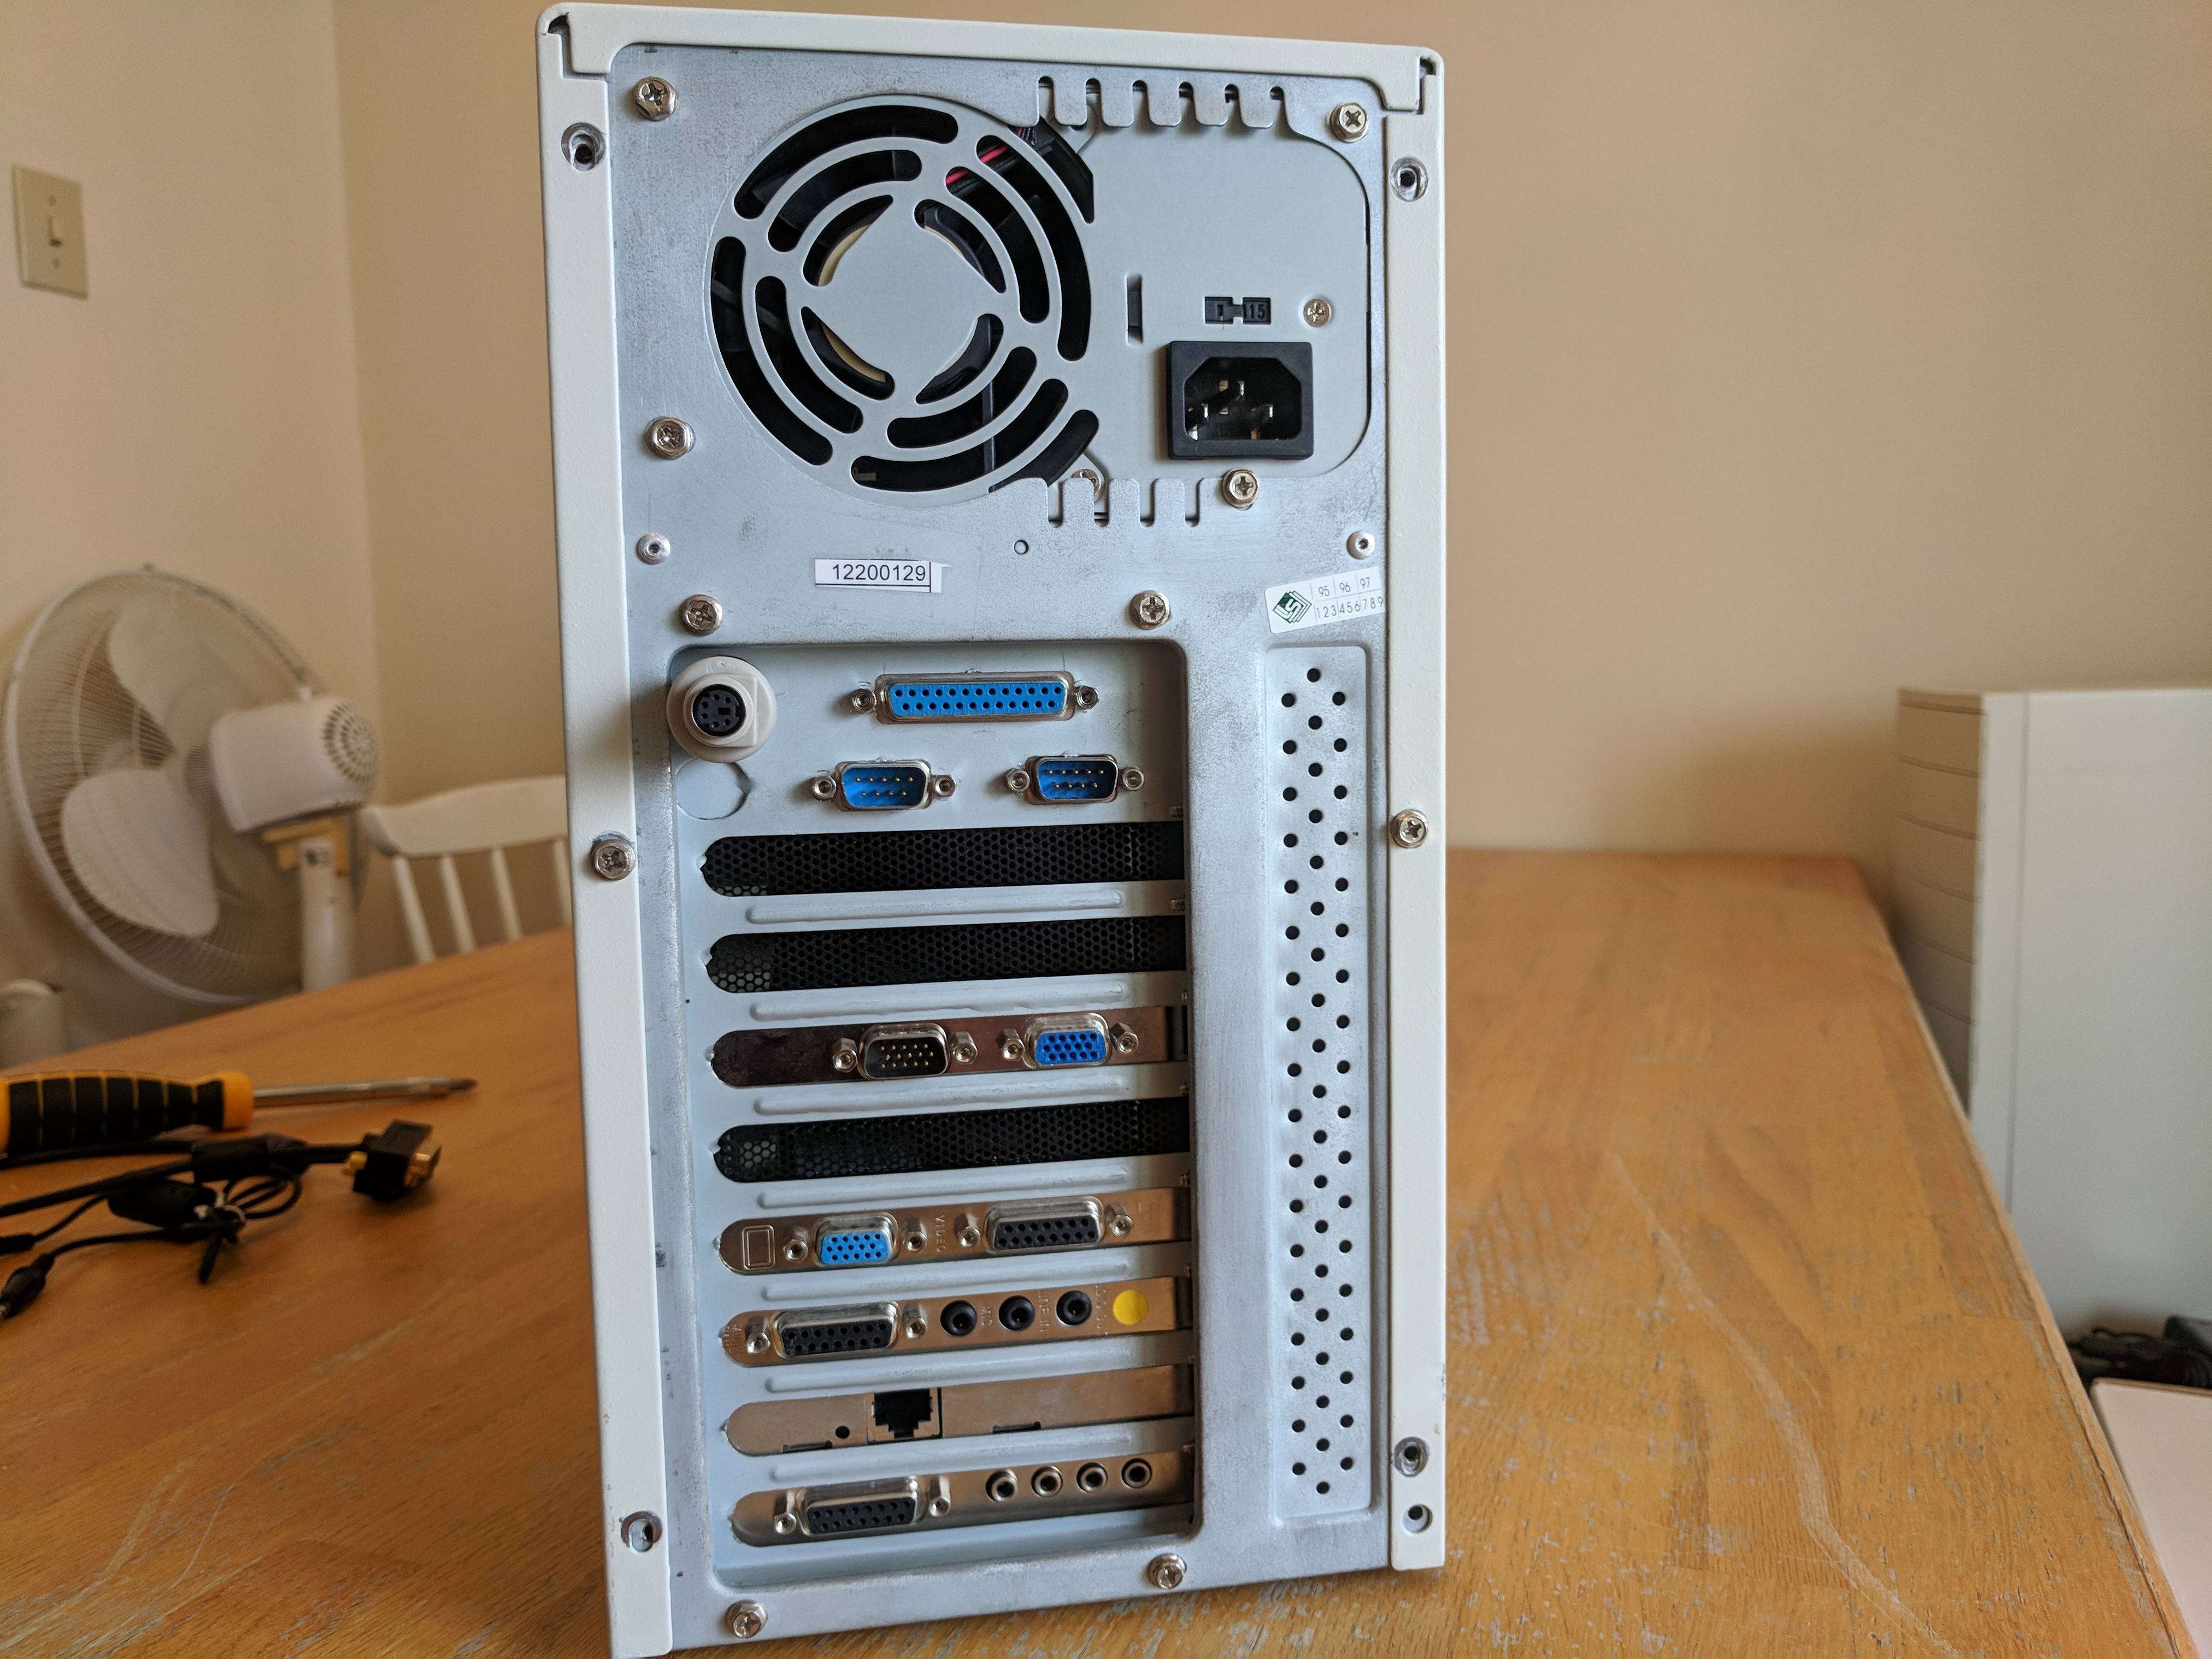
Assembly
If you've only ever built a PC in say, the past 12-15 years... well, this here is a different beast. Around 1998 or so, ATX was starting to become the standard form-factor for cases, motherboards and power supplies and it made building computers easier in a number of ways. As well, at that time, computer cases were slowly starting to be built to be easier to work with.
Before all of that however, you were working with the AT form-factor. AT cases are annoying to work with. Baby AT cases (the smallest AT form-factor) are especially annoying to work with. I don't even really know if the "old-school" charm of it all can really offset this annoyance. These cases are cramped and this is especially annoying as this is also in the era of expansion cards and/or motherboards which have many jumpers or other little wires or other plugs that need to be connected. Often these connectors are not located in convenient places. And you'll probably end up setting it up wrong the first (and second) time and have to adjust it and then you'll really feel the cramped-ness. But wait, there's more! Your hard drive(s), CD-ROM drive, and floppy drive(s) are all going to be connected with IDE cables which are long and flat and take up a bunch of space and you probably have to twist them around because the other end of the cable wants to be plugged in upside down or something like that. So this all makes the inside of your computer even more cramped. Wow.
The cherry on top of it all is that these cases could practically be considered weapons with how many sharp edges there are on the inside. You'll definitely end up with a couple cuts if you're not too careful.
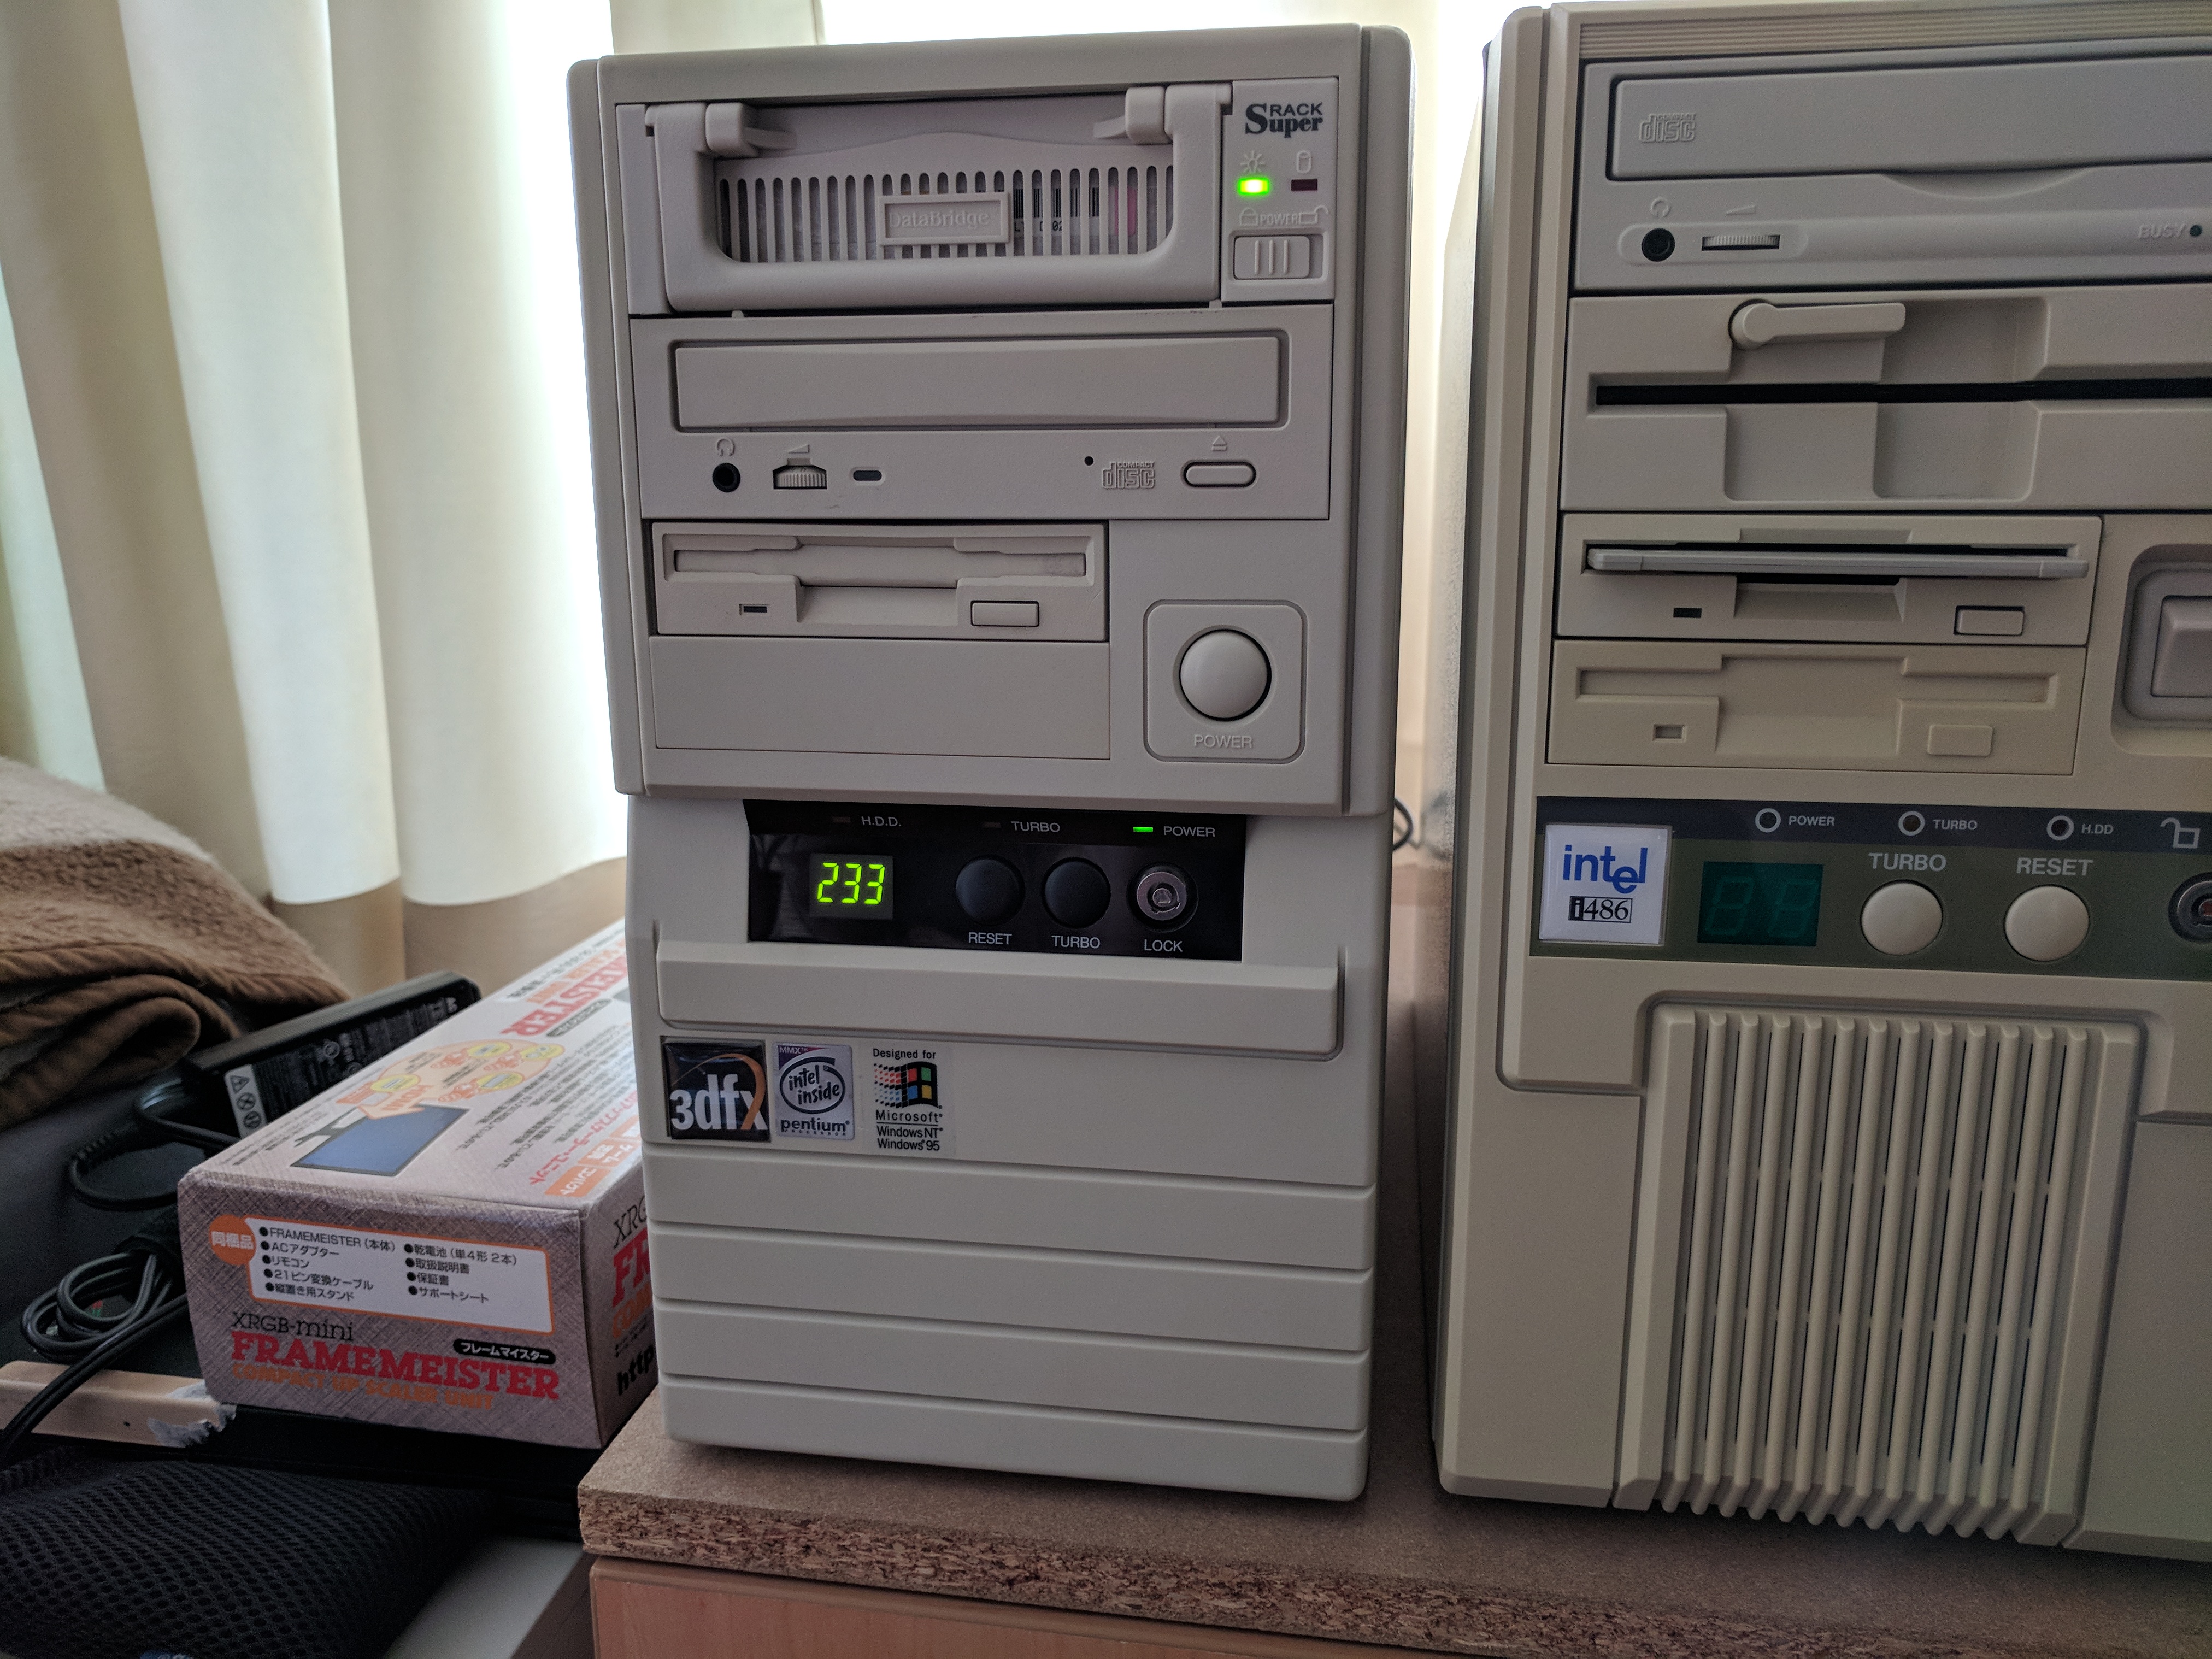
One example of where you'd configure jumpers on these older computers is for the (admittedly, pretty useless) "CPU MHz speed" LED displays that would be located on the front-panel of the case, usually alongside the power and reset buttons, and usually always accompanied by a "turbo" button. These displays are quite silly actually. They do not have any ability to somehow hook into your CPU and read it's current speed. All they do is display a fixed number that you "program in" by setting various jumpers on a large array of pins on the back of the little PCB that the LED display is on. Many of these would also have pins for the turbo button on your case (which would usually have two sets of wires hooked up to it, one you'd connect to your motherboard, and the other to the LED display). When hooked up this way, when the turbo button was pressed the LED display would start reading from a different set of pins on the PCB, allowing the number to change to reflect the current "turbo" state.
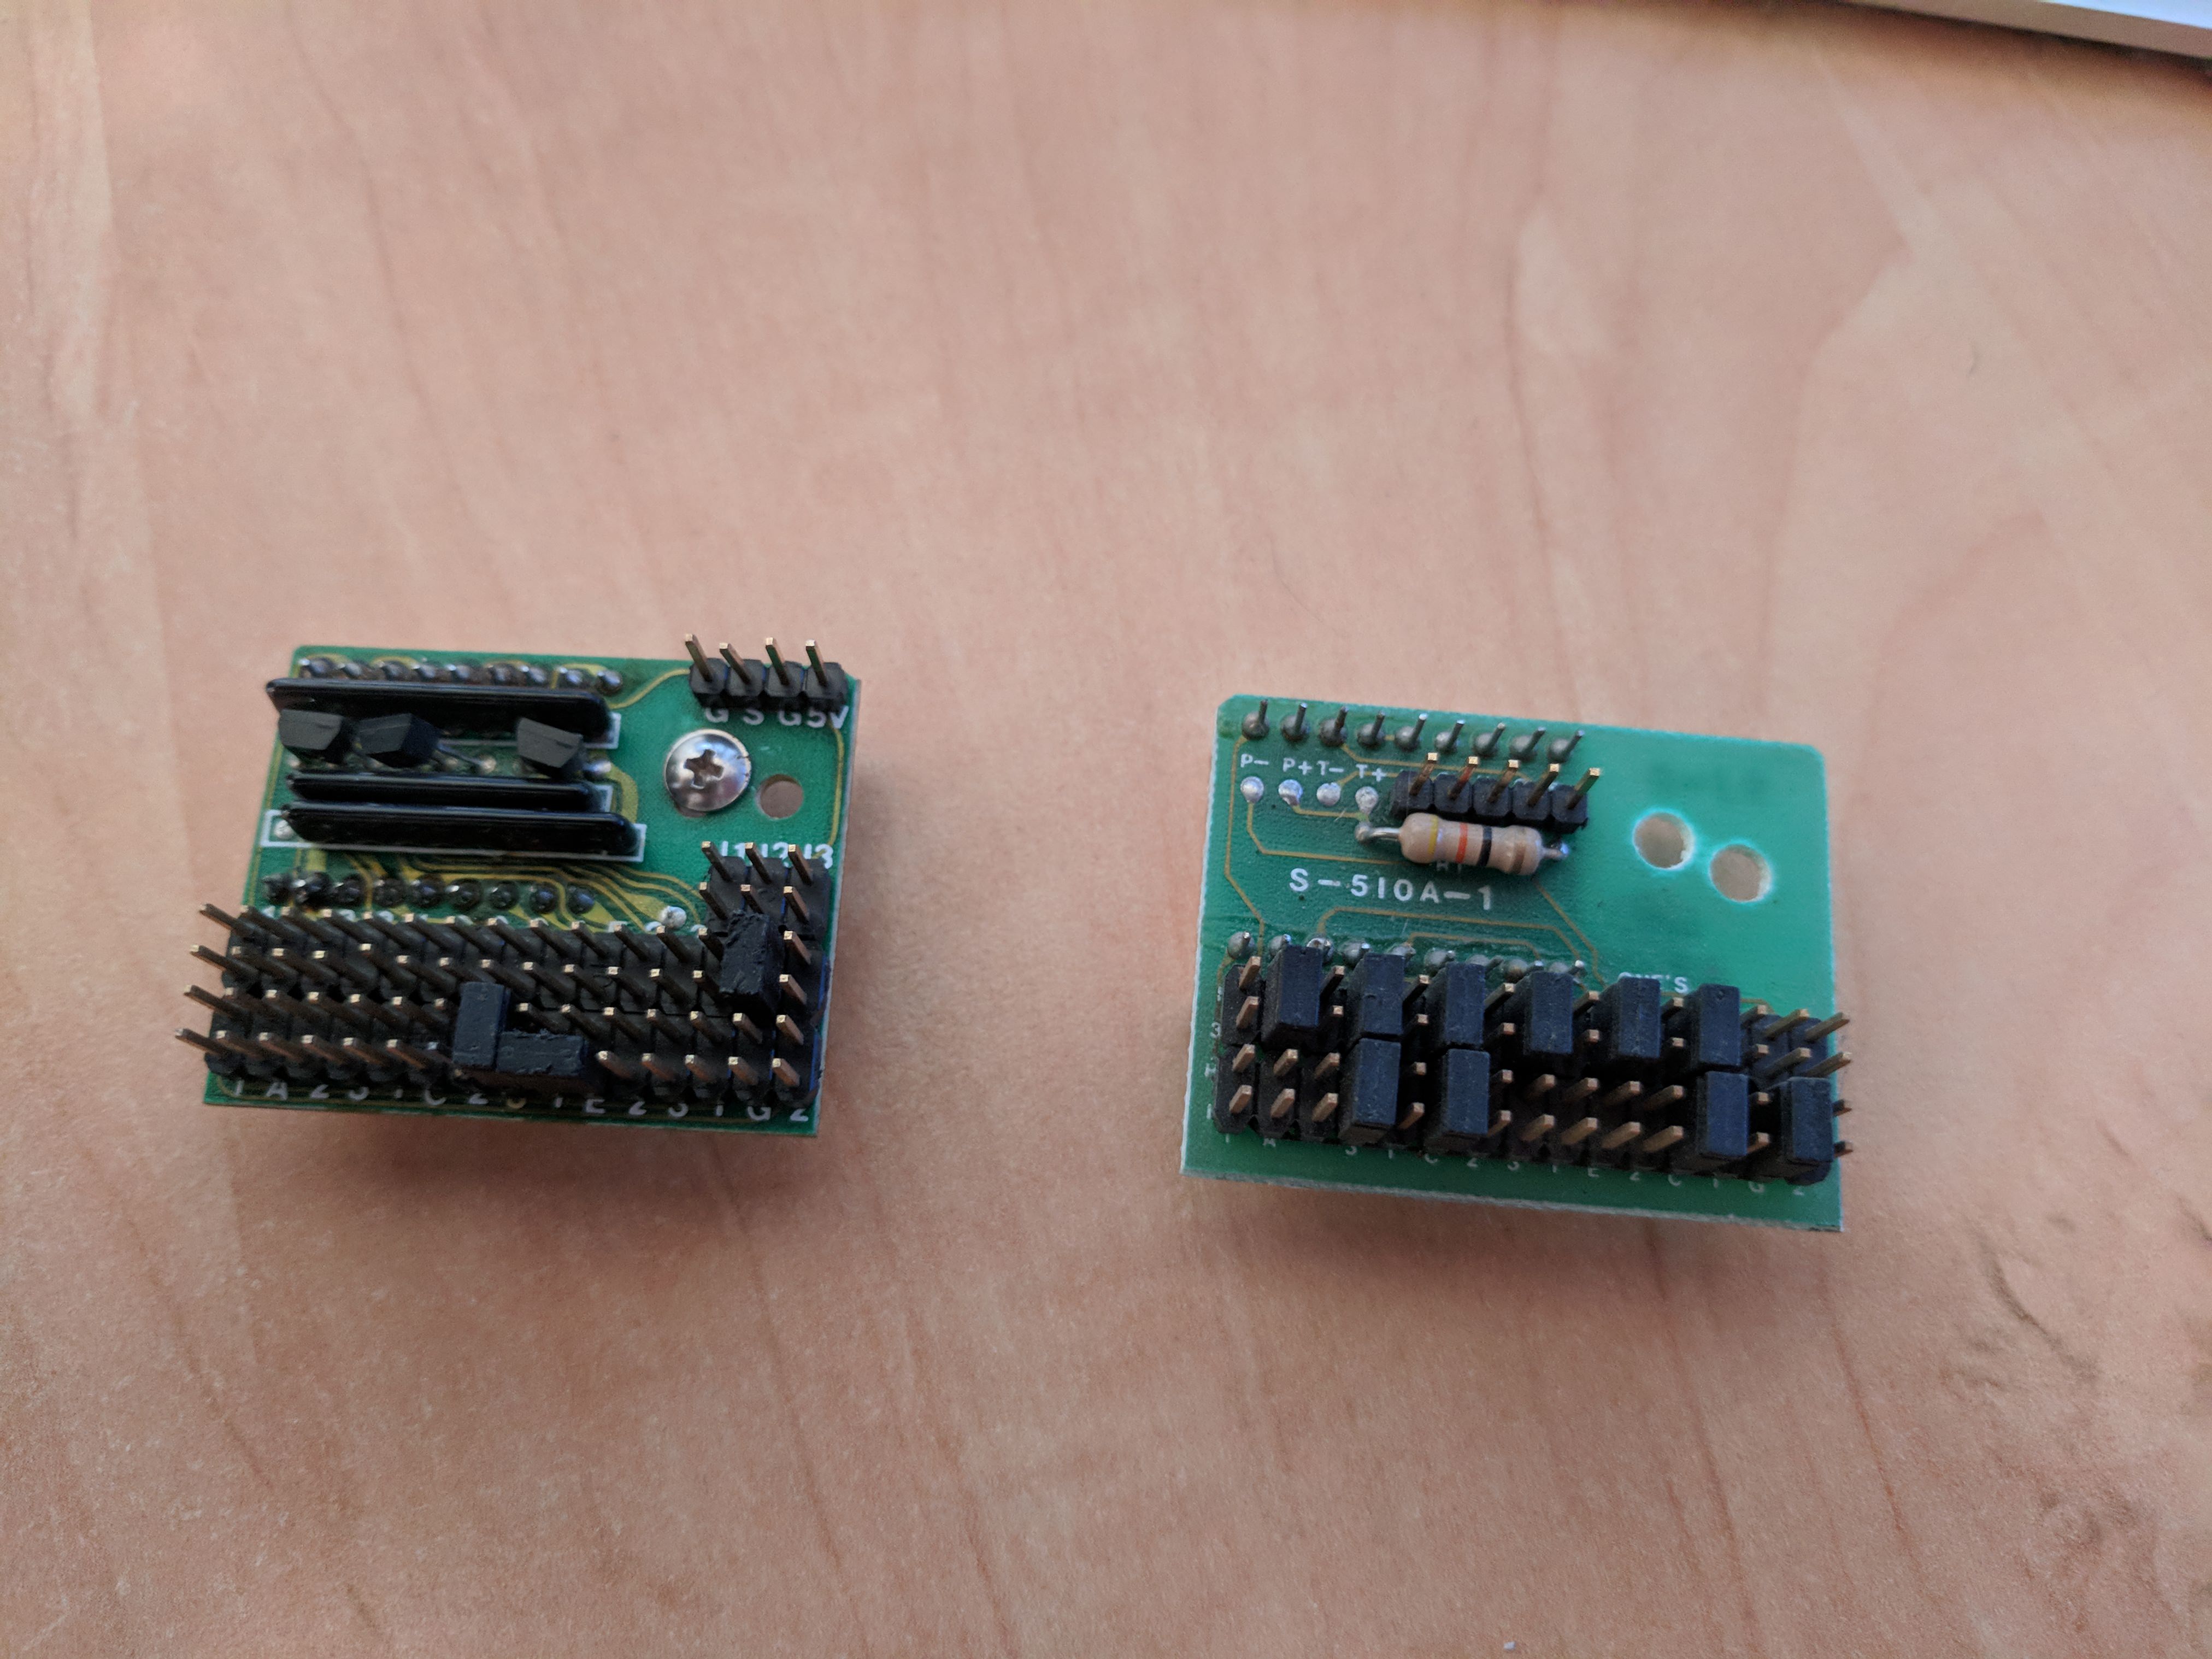
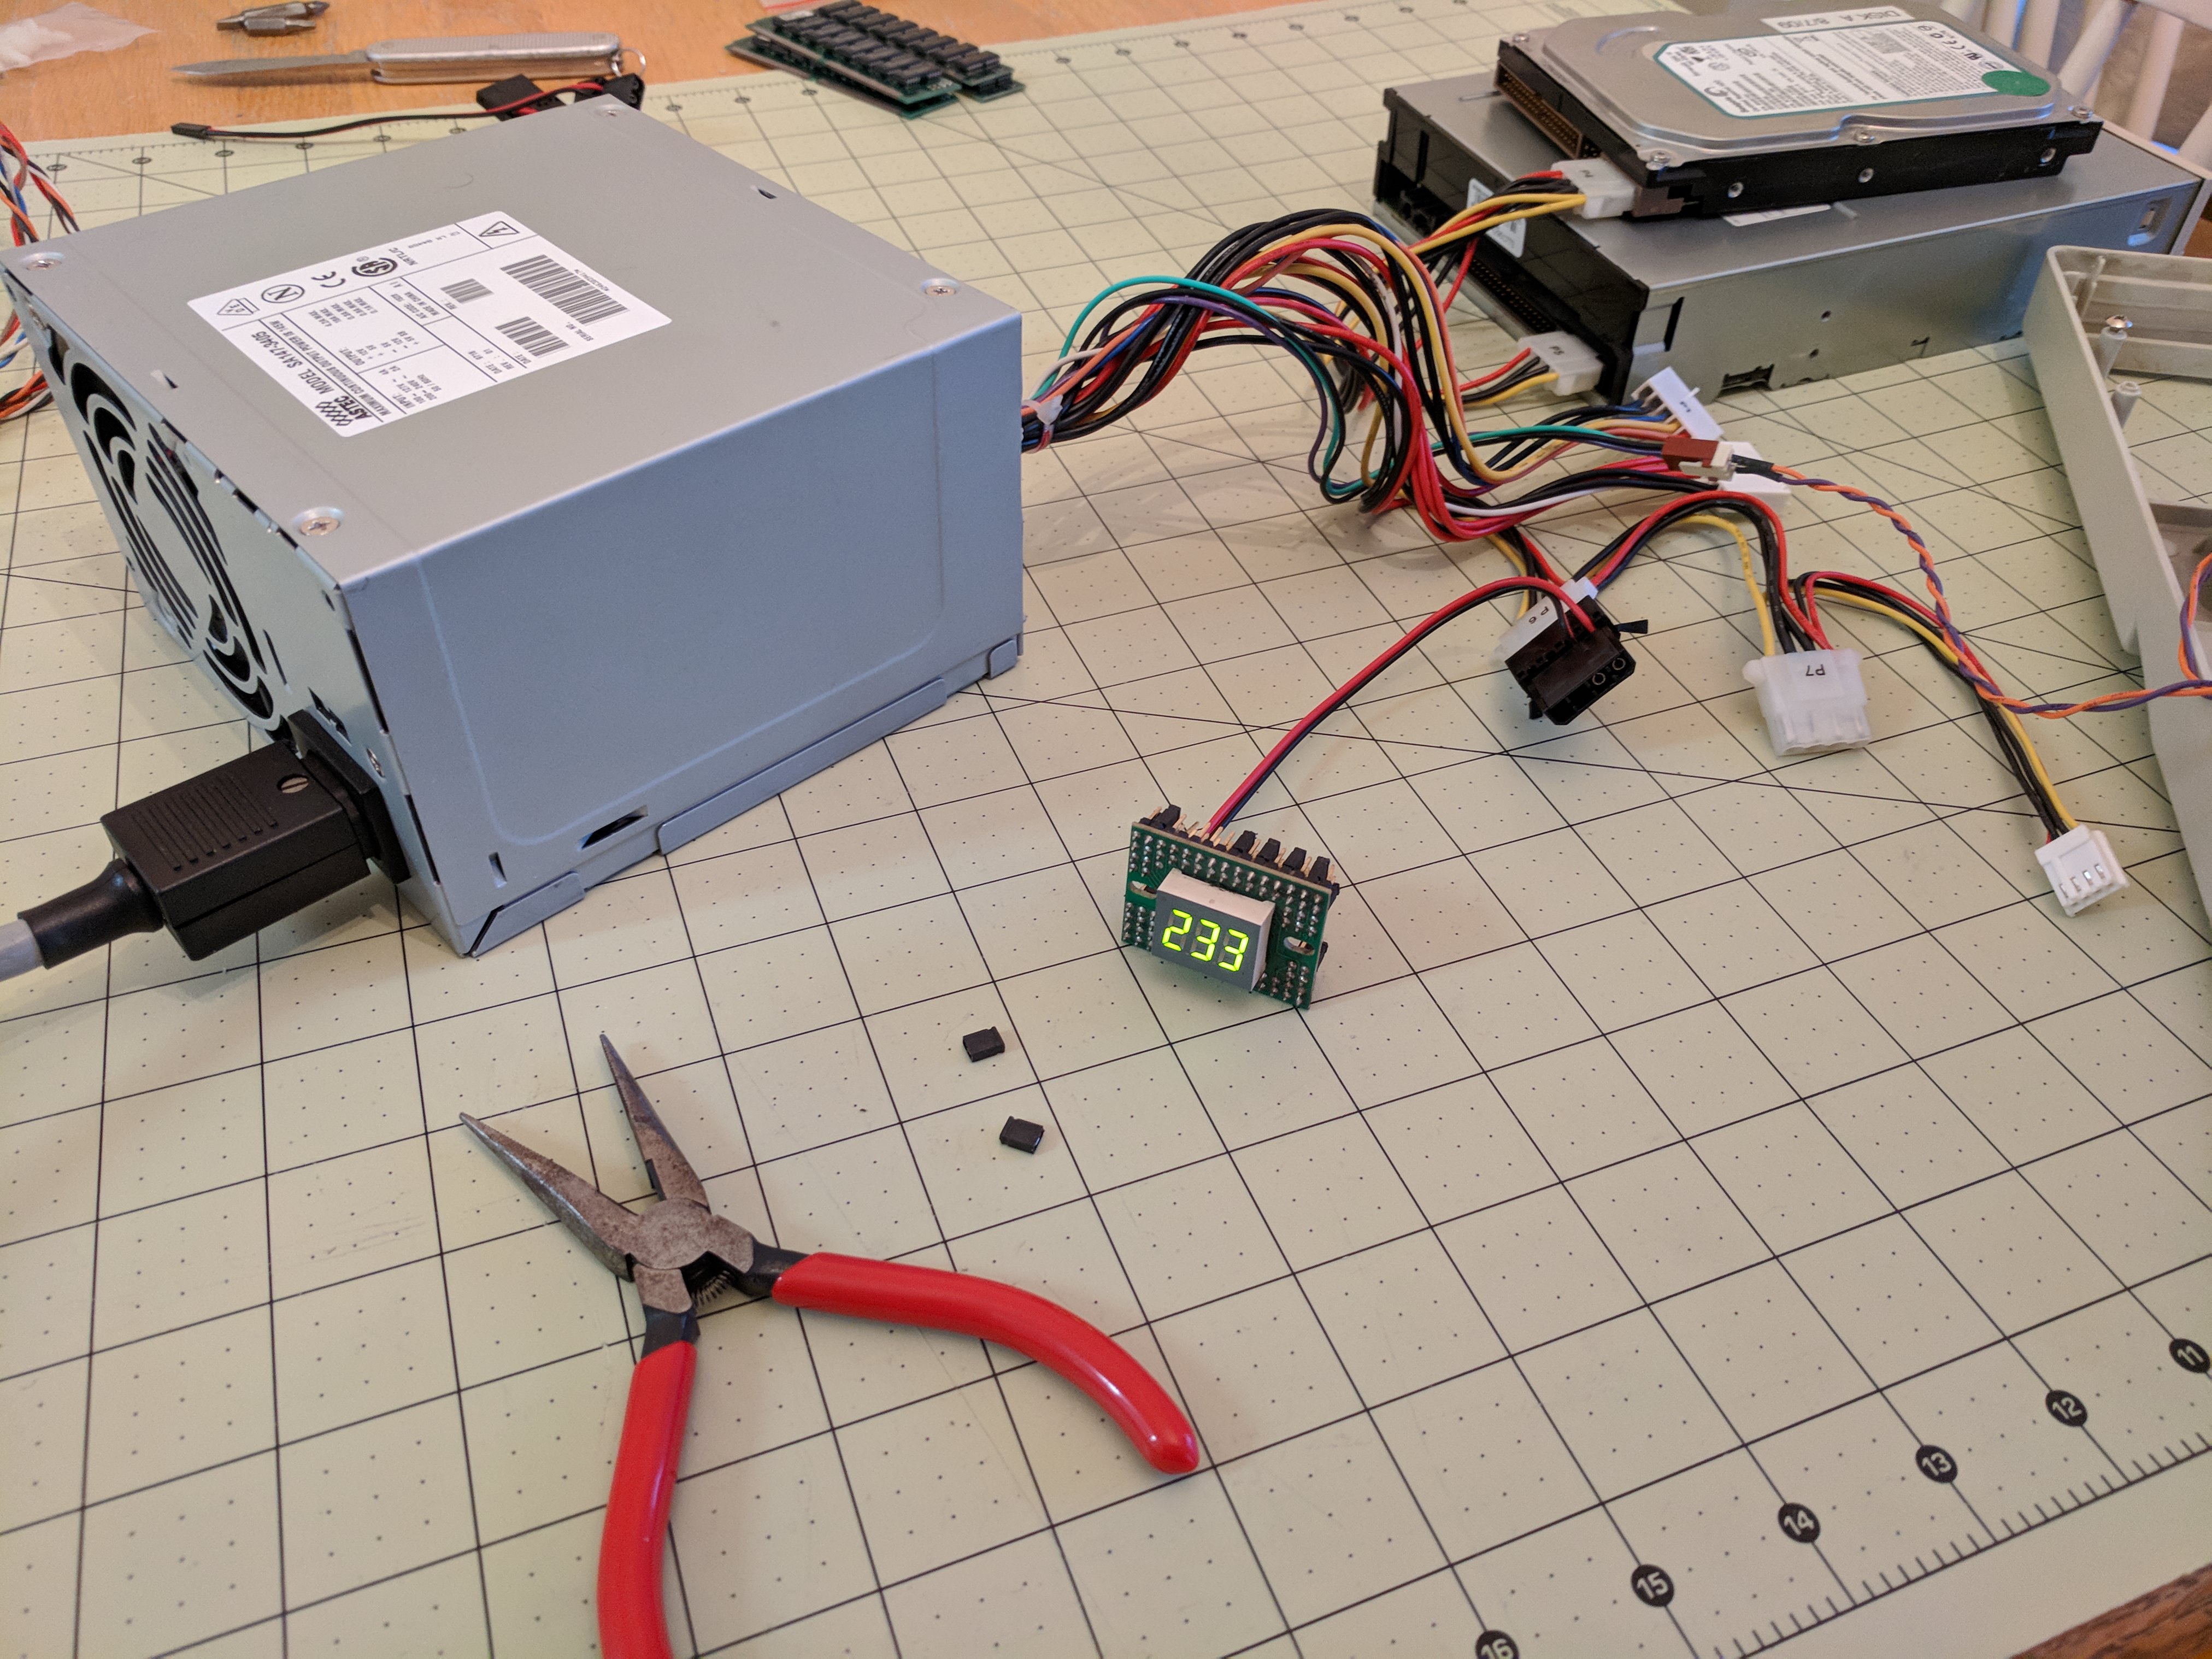
Shown in the left photo are the backs of two other spare MHz LED display boards I have. The way that I powered on the 3-digit display that I used in this build, in order to test the different pin arrangements as shown in the right photo, was probably not the best idea in hindsight. But I guess it worked out fine.
There were a great many different variations of these displays produced and you can still find scans for the manuals for a bunch of them out there, but I couldn't find one for the particular one I used here. So, I just used a trial-and-error approach, randomly placing pins until I had a good idea about what pins controlled what segments. Not a big deal.
There's a bit of a myth out there that I've read many times now on various forums, etc, that the "turbo" button found on older computers always worked in reverse to what you would think. That is, that pressing the turbo button in would result in your computer running slower, while when the turbo button was not pressed in, your computer would run at it's normal speed. Whether this was true or not for your old computer entirely depended on how the turbo button was wired up to your motherboard. The turbo button connector you'd connect to your motherboard was almost always a three-pin connector (certainly all of the ones I've seen have been) while there would only be two pins on your motherboard to connect it to. Depending on which two of the three pins you connected would determine how the button would behave. On my 486 for example, I specifically connected it so that when the turbo button is pressed in, the computer runs at full speed, as that makes logical sense to me.
This Tyan motherboard I am using here has no pins on the motherboard for turbo button functionality, so it is left disconnected. The turbo LED (not the speed display, but just the LED on the front panel that turns on when the button is pressed in) is instead hooked up to the sleep LED pins on the motherboard. Meh.
Anyway, yeah... many little pins. Actually this build wasn't too bad in that regard once the MHz speed LED was taken care of. And because Socket 7 boards usually (always?) included the I/O connectors for your hard disk, floppy drives, serial ports, etc on board, you didn't need to install any multi-I/O cards which usually came complete with a ton of jumpers. On these later Socket 7 motherboards, the only jumpers you probably had to set would be for overclocking purposes.
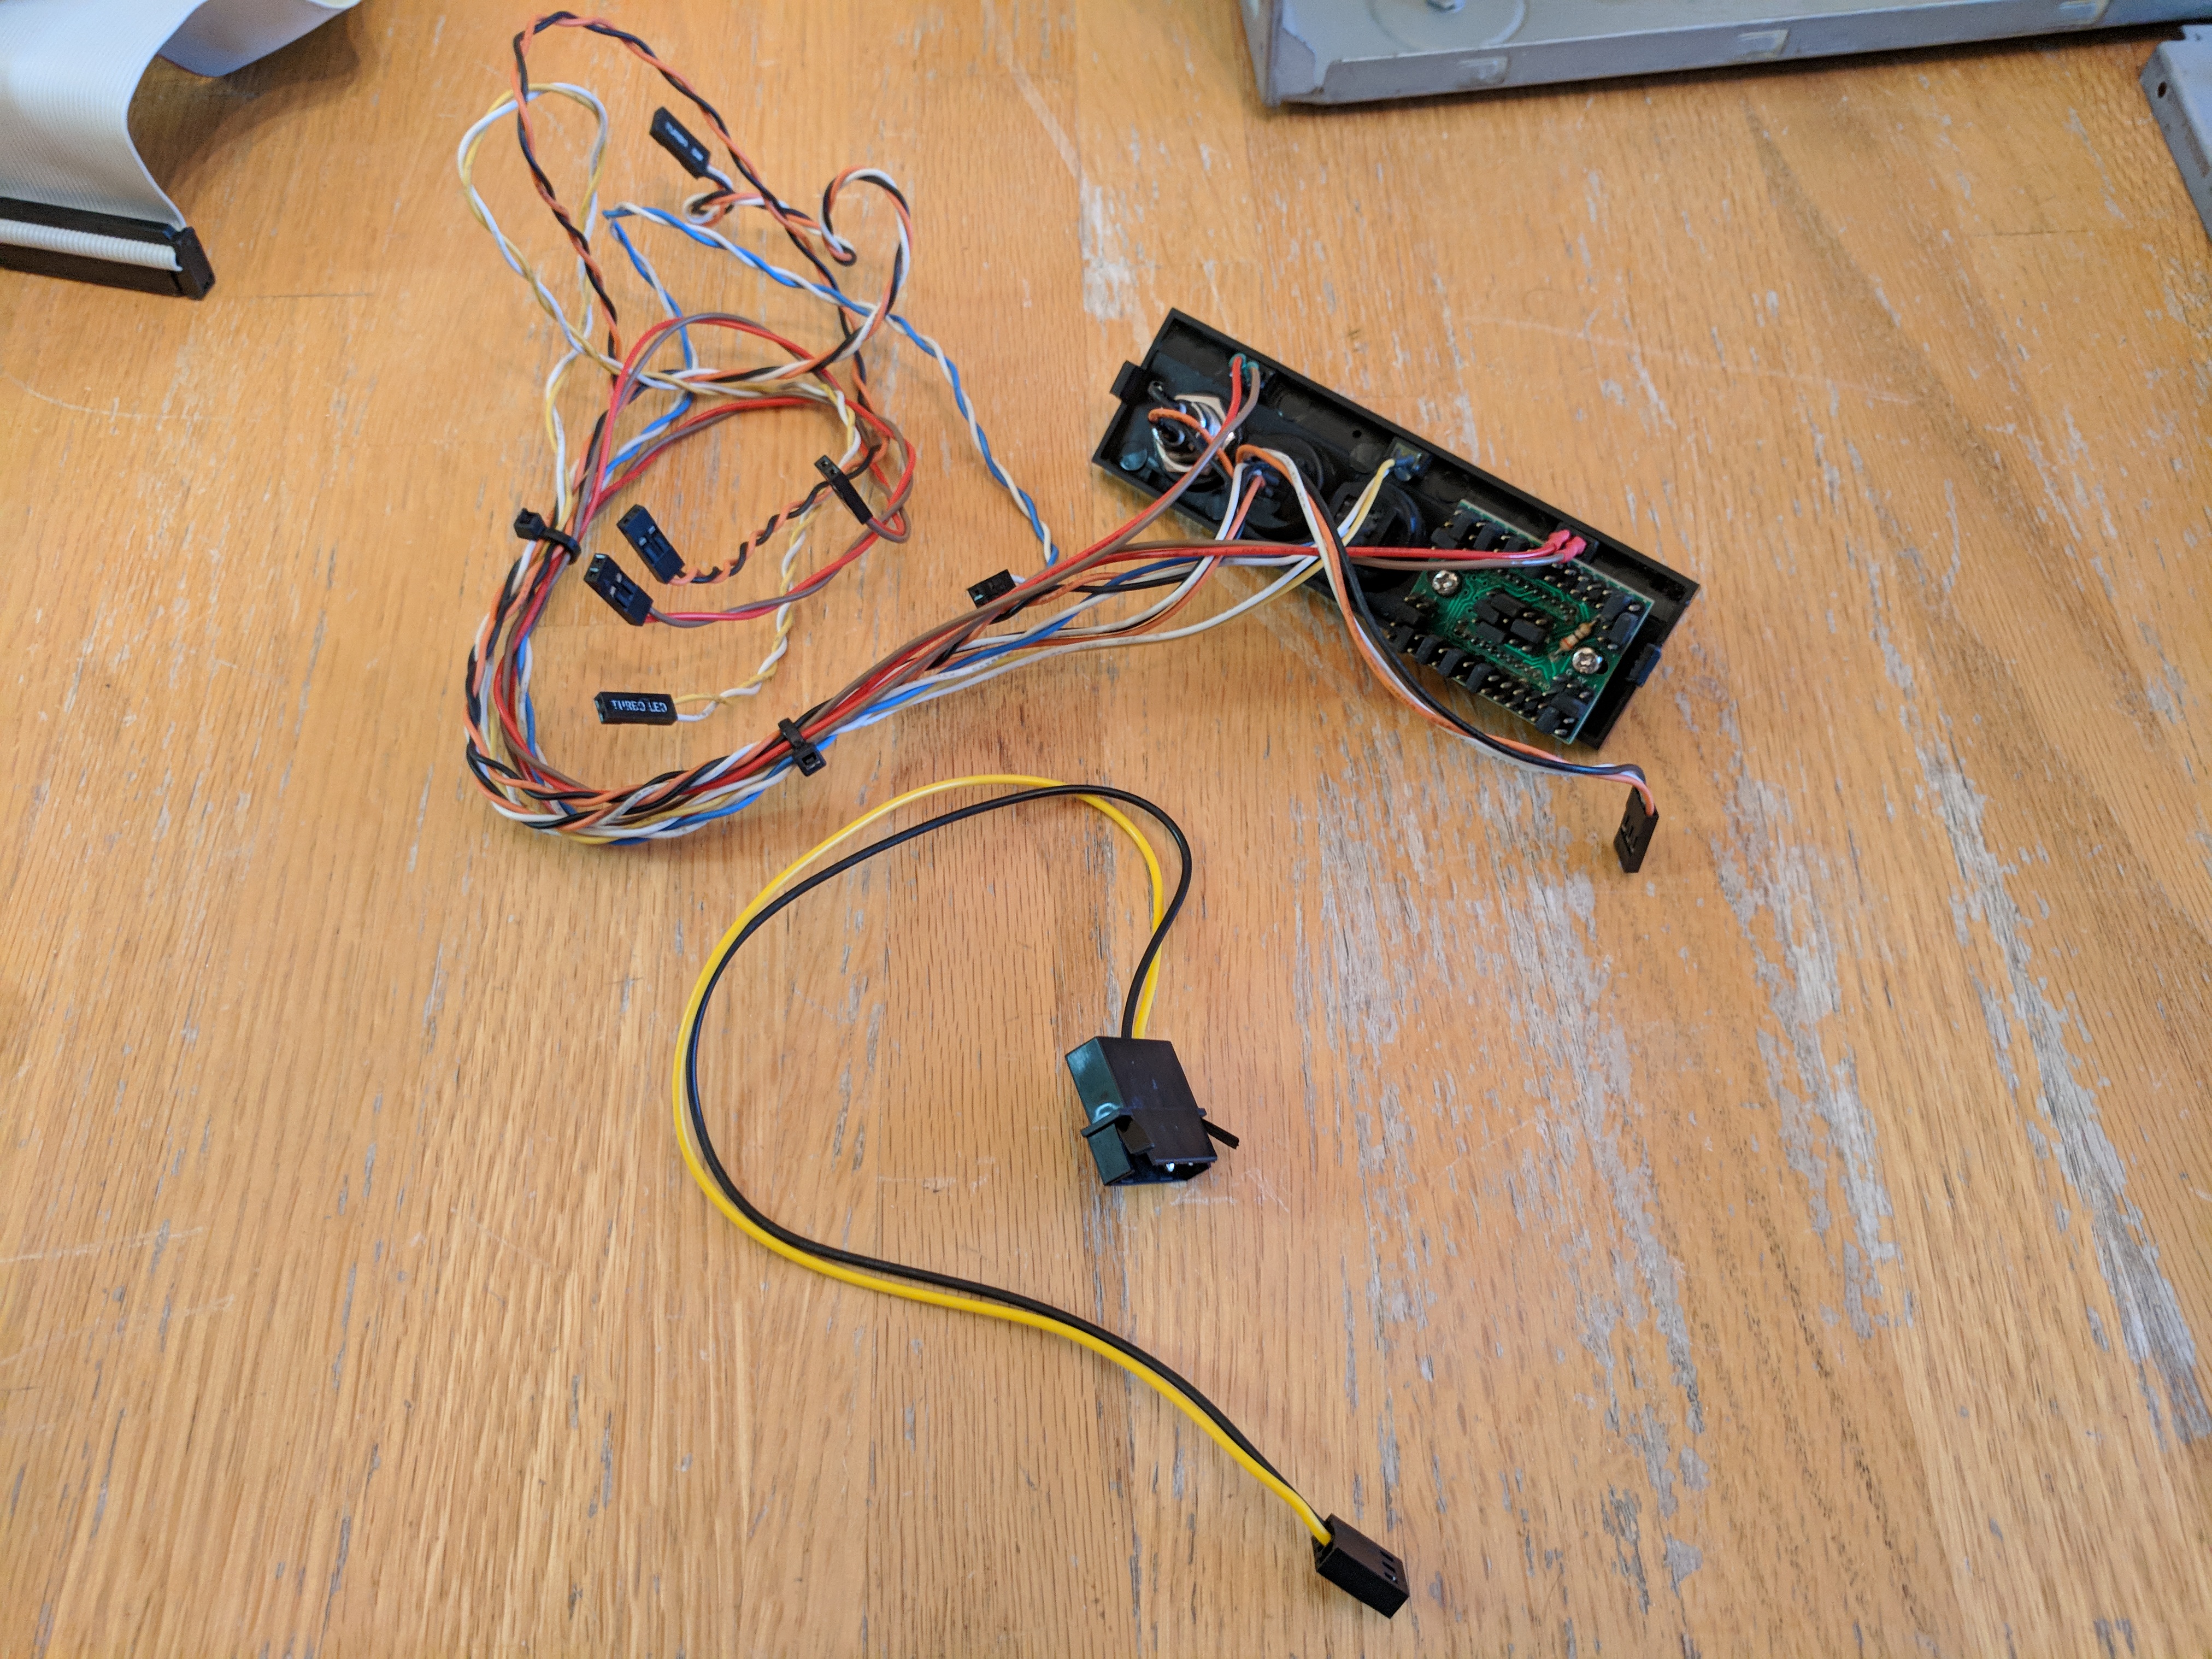

Some AT power supplies come with a little connector that you can hook up directly to the MHz display LED to power it. The power supply that I am using does not have this ('nor did the one I used in my 486 build). So, what I do is buy these molex-to-3pin connectors (shown in the first photo above) that are really intended to be used with case fans. However, this specific cable that I use here needs to be hacked up a bit first in order to use it with a MHz display LED. As-is, this connector will connect to the 12v line from a standard AT/ATX molex power connector which is too much for a MHz display LED (I may have found that out the hard way one time... thankfully it only resulted in a burnt out resistor that was easily replaced... oops!). So, I just cut the plastic a bit so that the connector will fit in reversed, such that the yellow wire on this cable connects with the red 5v line from the power supply's molex power connector. Finally, the smaller 3-pin connector on the other end of this cable is a little bit too big for all of the MHz display LED boards that I have. So, I just shave a bit of the plastic to make the connector shape smaller and then it fits just fine and works perfectly. I'm sure that there might be some perfect cable out there for connecting power up to these display boards, but after hours of searching I could not find anything.
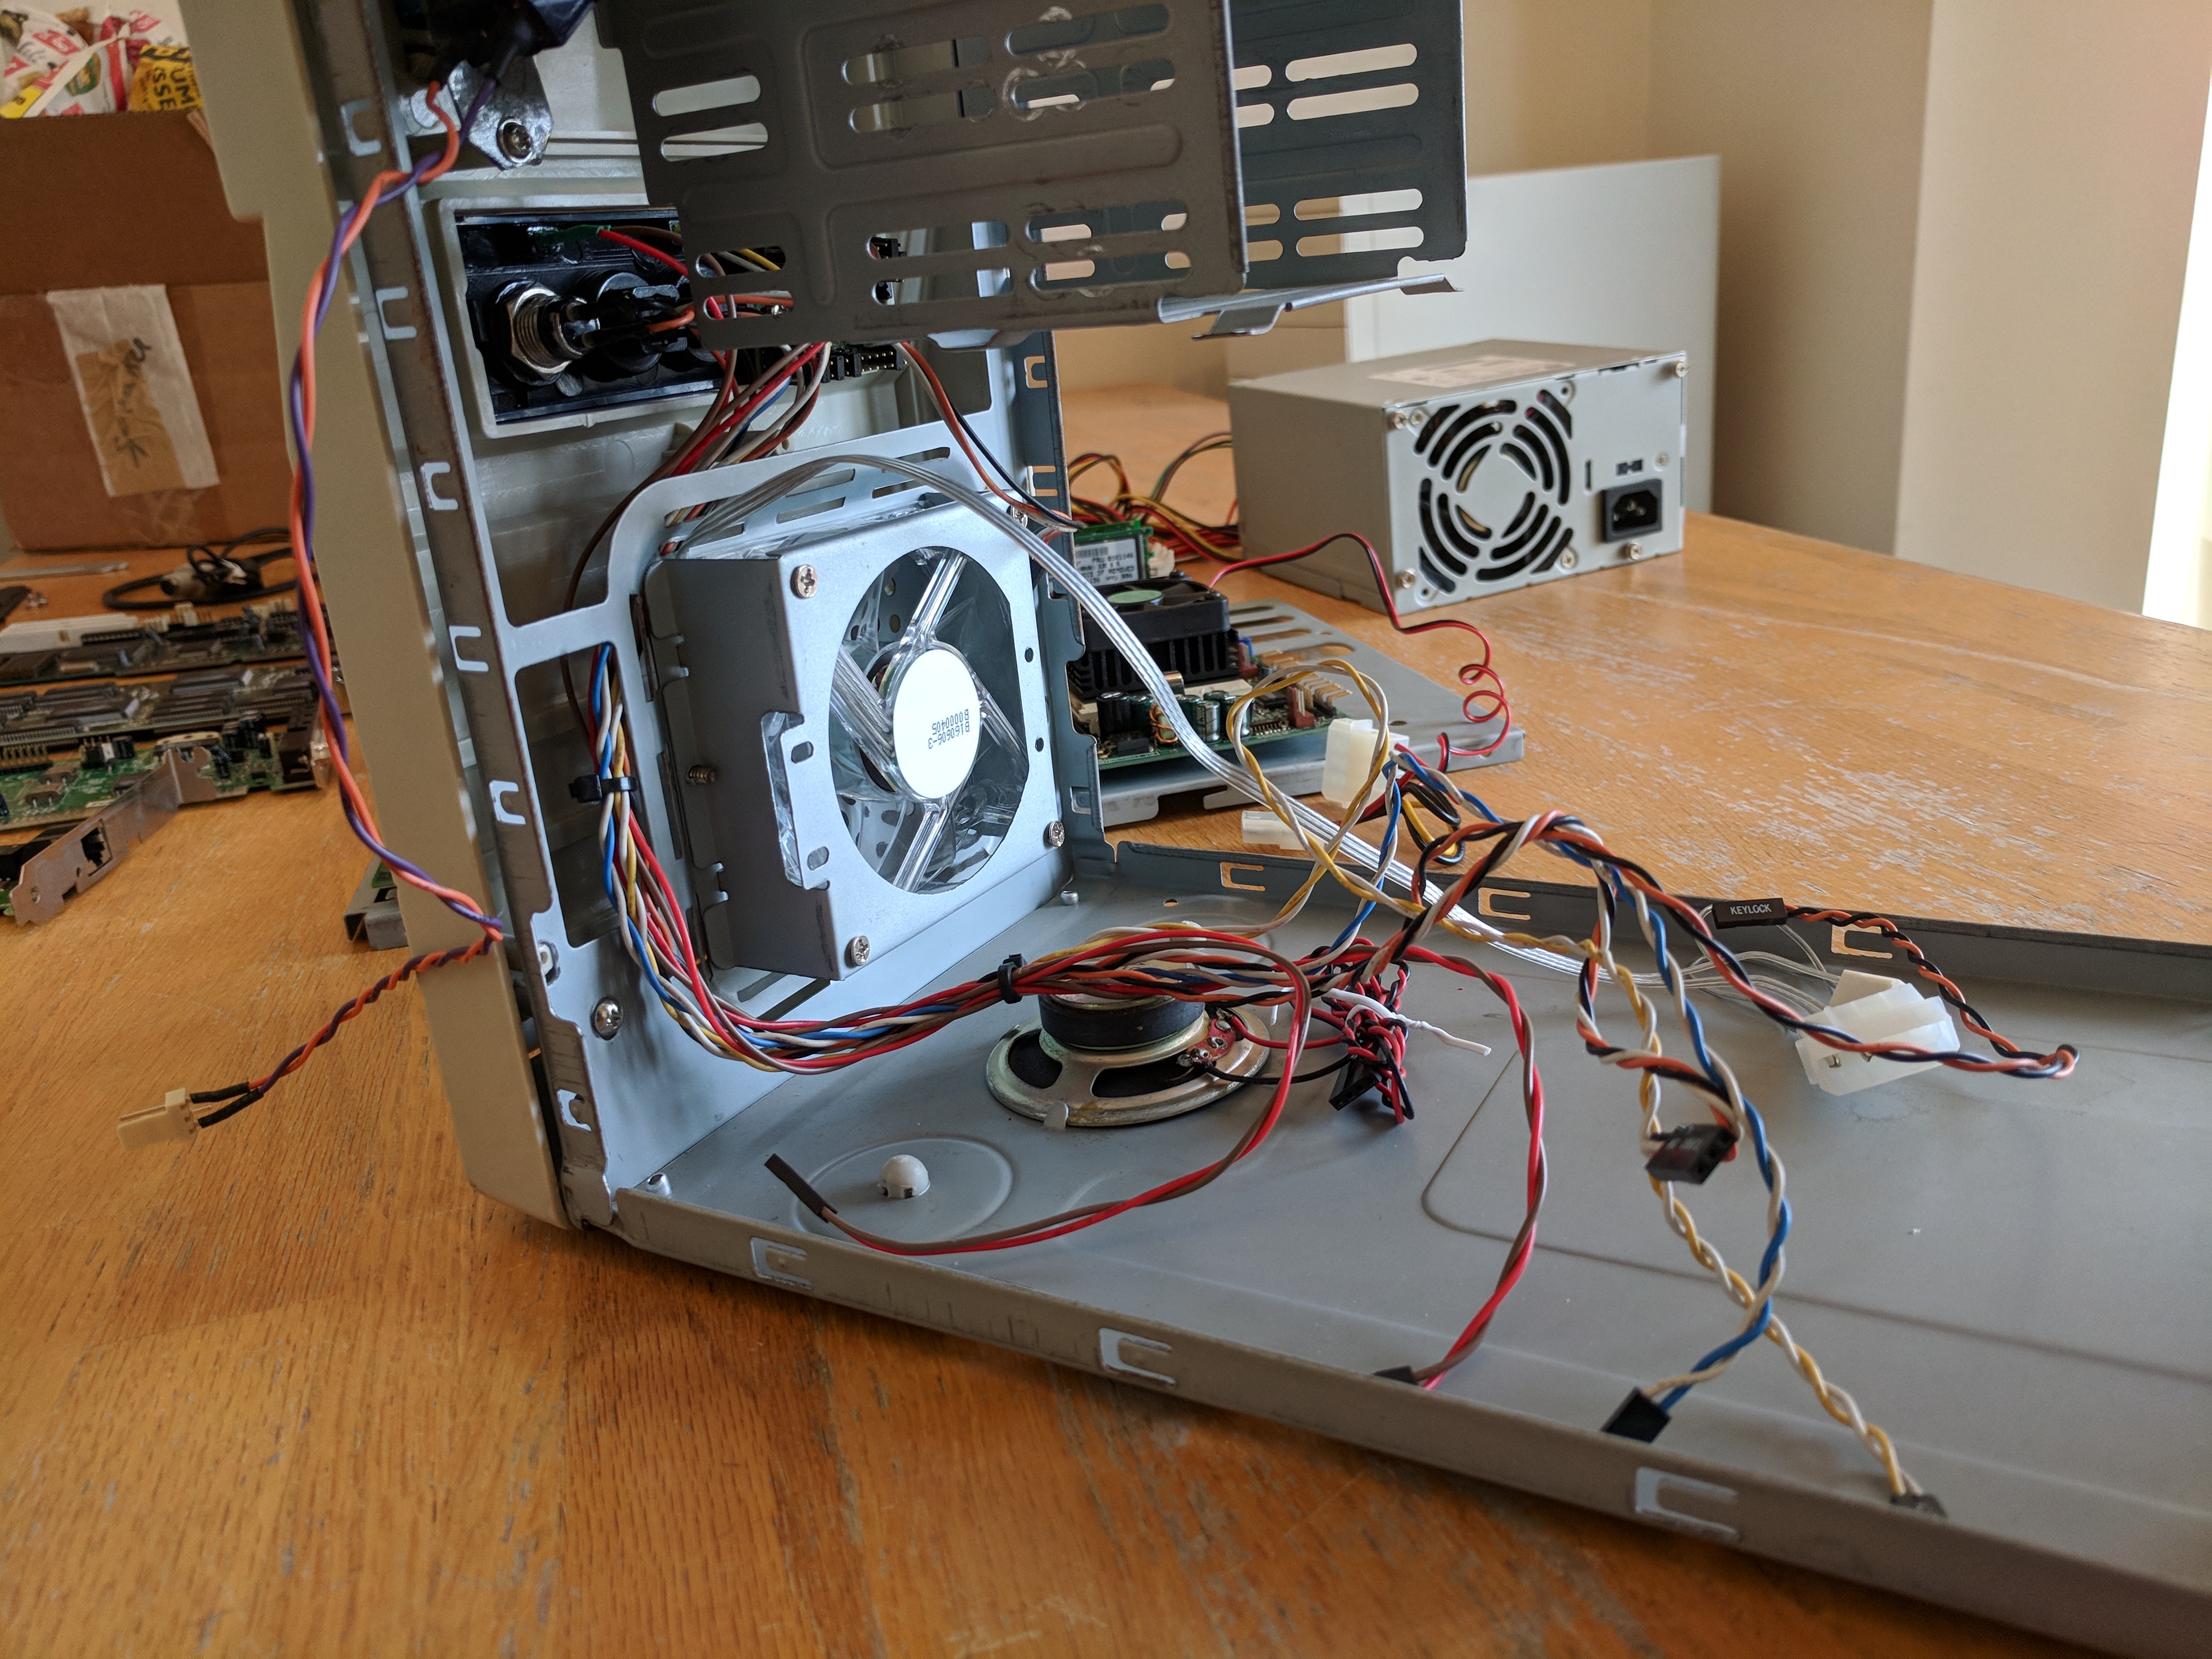
The remaining pins to be connected are the ones on the motherboard for all of the front-panel buttons (such as the reset button), and the LEDs (power, hard-disk activity, sleep). This motherboard is a bit weird with the pins it provides for this. It appears to simply be missing ground pins for many connectors. For example, there are voltage pins for the power and sleep LEDs, but no ground pin for either of them (as you would expect to find right beside each other when connecting up a 2-pin cable). I can only assume that some cases maybe had different types of connectors for this that this motherboard was intended for? No idea honestly. So I improvised here by buying some cables to borrow the other unused ground pins from elsewhere (there were two others that I was not using for anything else). It just added to the mess of wires inside, but I guess it works.
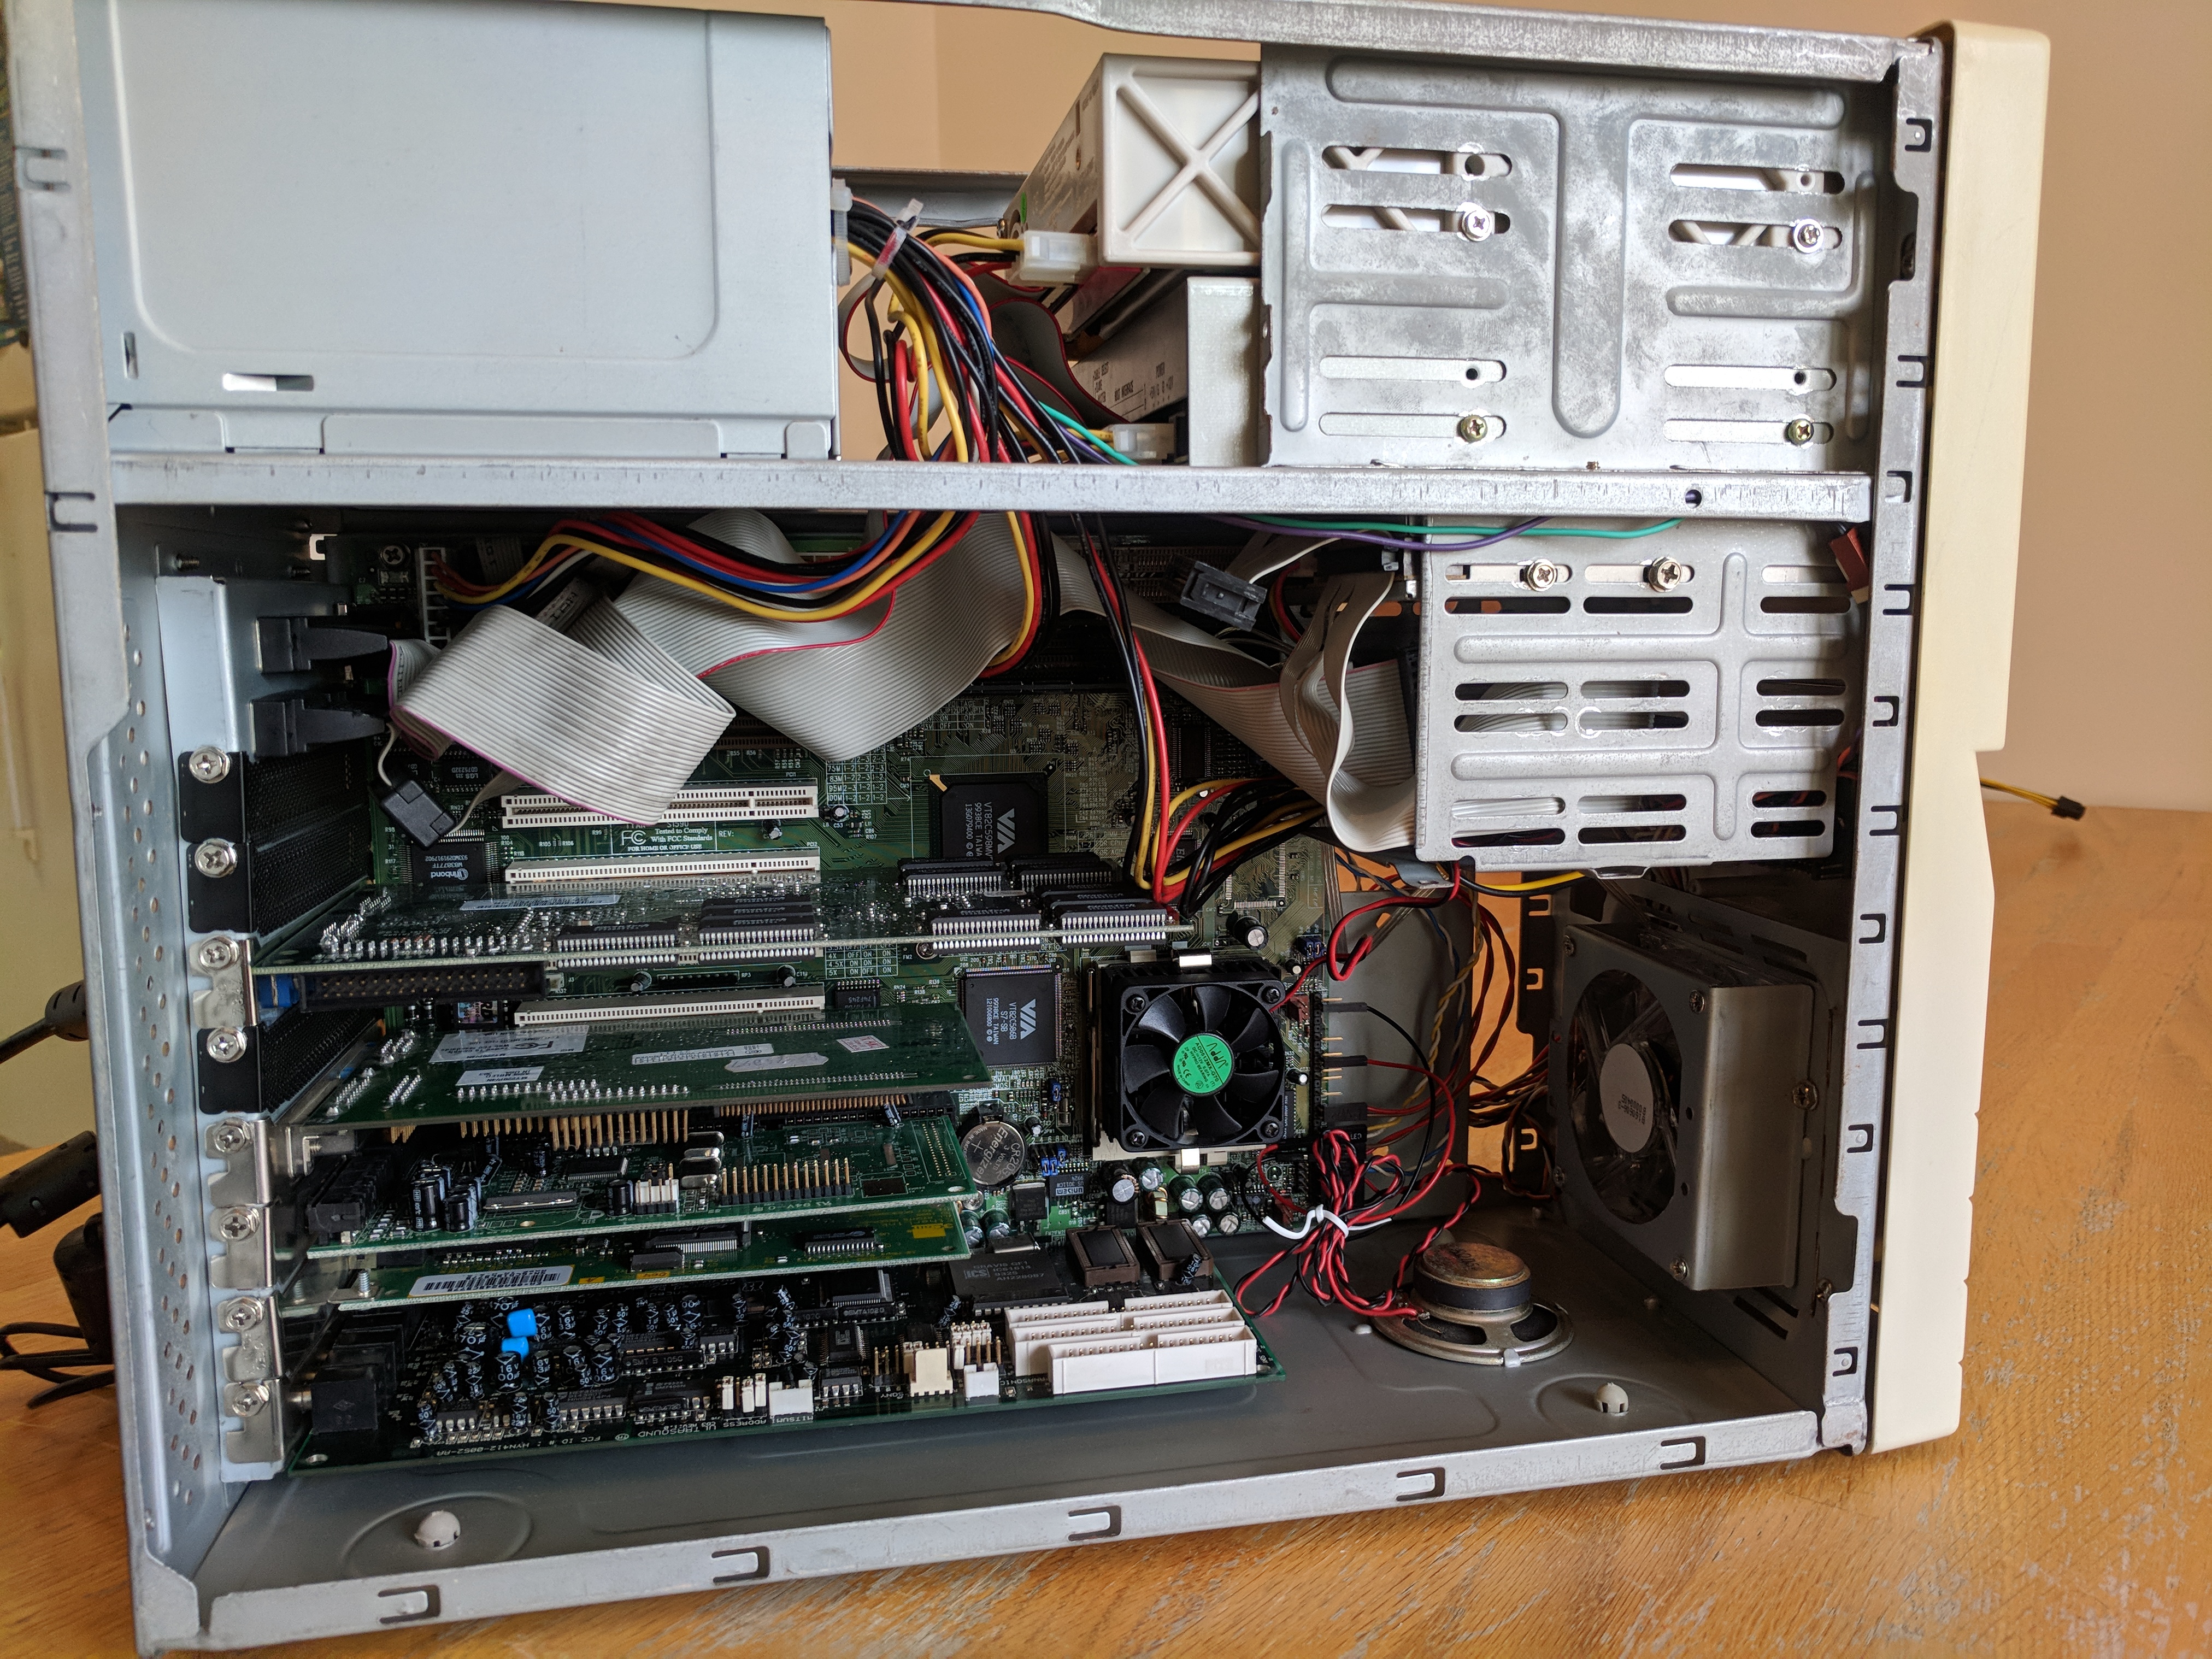
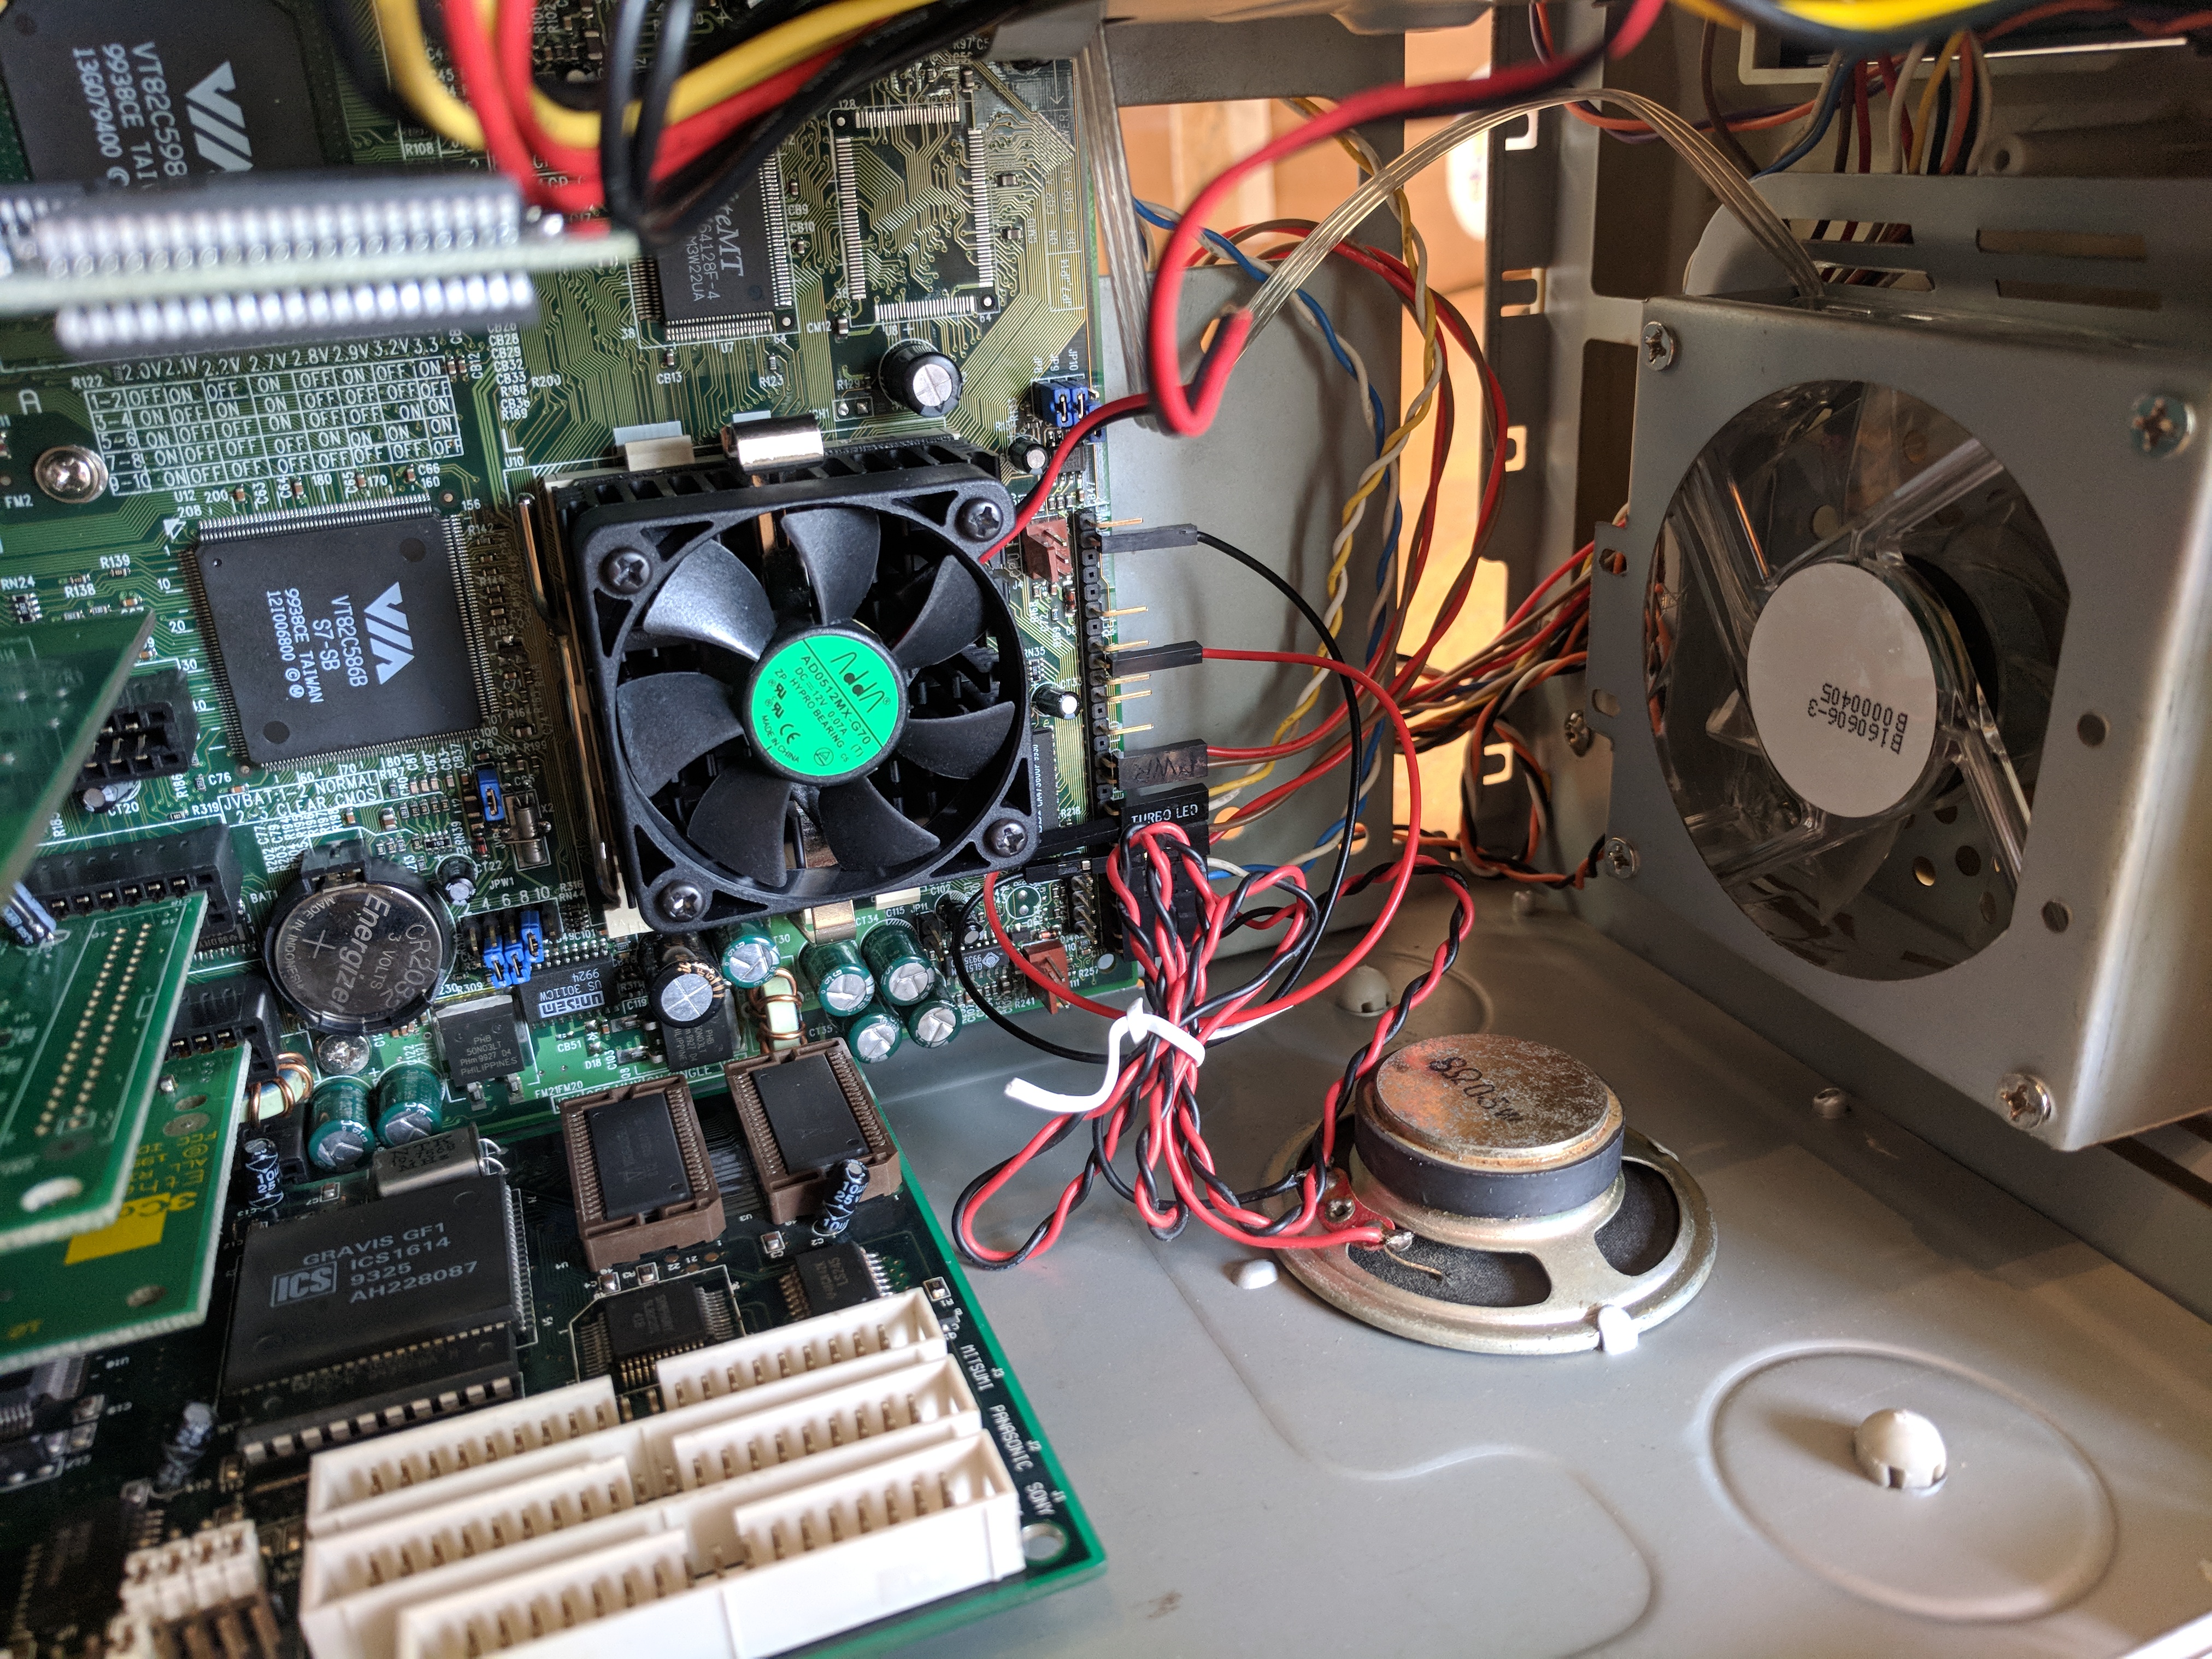
You might recall that when discussing what motherboard I was going to be using near the beginning of this post, I mentioned how I figured that the AGP slot on this motherboard was not going to be useful to me due to my use of a baby AT case. This photo shows exactly why. You cannot even see the AGP slot because those cables are directly in the way. I'd need to do some really serious cable management here to clear that space to be able to fit an AGP card that did not have these cables laying flat all over the top of it.
That being said, I suppose that I am mostly happy with this cable management. The number of cables is reduced somewhat because I decided to use a master/slave arrangement on just the primary IDE interface, putting both the hard disk and CD-ROM drive on the same IDE channel. Yes, this does impact performance in cases where both the hard disk and CD-ROM are being utilized at the same time, but I'm not really that concerned. That kind of thing doesn't happen all that often. And having one less IDE cable in this small case really made a big difference. The one thing I'd still like to change here is to get a shorter floppy cable. There was too much slack left over on it once I had it all connected and I just had to shove it off into the hard drive bay (which thankfully was empty due to my use of a mobile rack enclosure to put the hard disk in).

Conclusion
That's pretty much it. I am quite happy with this build. I think most people would definitely want to slap an AMD K6-2 or K6-III CPU in there, which as I mentioned above, I will likely do at some point down the road (probably will bounce back and forth between them over time). But even configured as-is with the Pentium 233 MMX, it runs nicely in both DOS and Windows for "general use" and it plays DOS and Windows titles from the early/mid-90's up until 1998 or so and then things start getting a little bit slow. For older speed-sensitive games, disabling CPU caches does help to slow the system down (even if it is annoying to have to do so). For the more high-end games released in 1998 or so, I've also been mostly pleasantly surprised. I did play through the entirety of Unreal on this shortly after building it almost two years ago now, and I had a great time. I found that setting it to a 512x384 screen resolution was a nice balance between framerate and detail, probably owing a fair bit to the 100MHz FSB that I configured this all with. Since I'm using a CRT monitor, I can get away with using these "odd-ball" screen resolutions and not have to worry about how it will look scaled up.